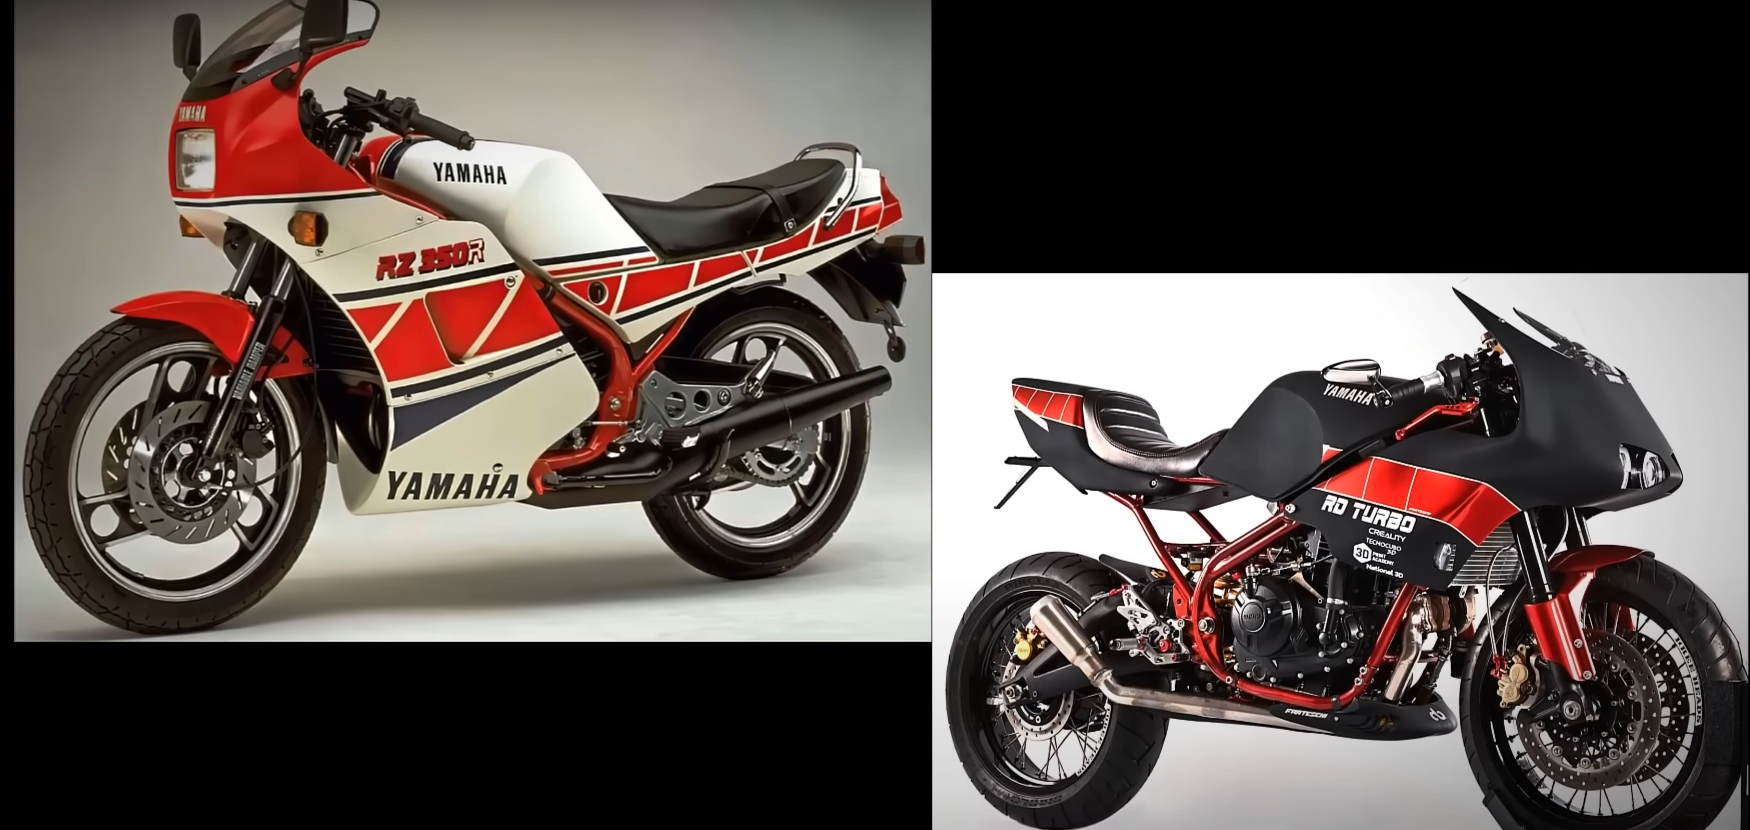
The Yamaha RD 350 earned a reputation for being both thrilling and dangerous, known for its light frame and powerful engine. Years later, a builder in Brazil set out to reimagine this classic motorcycle, blending its legacy with modern engineering. His goal was to create something that looked and felt like a new version of the RD 350, while improving safety, reliability, and performance.
The project began with limited original parts and a clear vision. Using a modern Yamaha R3 engine, reinforced frame, and advanced 3D printing, the builder transformed the concept into a functional and stylish machine. Every detail—from the brakes to the fairing—was carefully designed to reflect both innovation and respect for the original model.
Key Takeaways
- The project reimagines a classic motorcycle with modern engineering.
- Advanced tools like 3D printing helped achieve precise custom parts.
- The build balances performance, safety, and design in a fresh interpretation.
History and Legacy of the Yamaha RD 350
Early Development and Evolution
The Yamaha RD 350 earned a reputation as one of the most powerful and unpredictable motorcycles of its time. Riders often called it the “Black Widow” or “Widow Maker” because of its intense performance and weak braking system. Its light frame and strong two-stroke engine created a thrilling but risky riding experience.
In Brazil, the first RD 350 models featured a half fairing, a design choice that inspired later custom projects. Builder Renato Frateschi, from Frateschi Garage, honored that heritage when he created a modern version using the same fairing style. His project began in 2022, based on a client’s request for a unique build.
| Key Features | Original RD 350 | Custom Project |
|---|---|---|
| Engine Type | 2-Stroke | 4-Stroke (Yamaha R3) |
| Fairing | Half | Semi |
| Brakes | Basic | Brembo, 300 mm discs |
| Frame | Light, flexible | Reinforced for stability |
Renato replaced the rare original engine with a Yamaha R3 motor to stay within budget. To enhance performance, he added a turbo system, which required extensive frame modifications. He reinforced the chassis, improved suspension, and fitted 17-inch wheels for better handling.
Influence on Motorcycle Design and Enthusiasts
The RD 350’s legacy continues through custom builds like Renato’s. His use of 3D printing and augmented reality tools showed how modern technology can revive classic designs. He created the rear and front fairings using large-format 3D printers, a difficult task at the time due to material limits and heat resistance challenges.
This project balanced modern reliability with classic style, keeping the aggressive look of the original while improving ride quality. The build featured a Triumph Daytona 675 swingarm, custom aluminum parts, and precise engineering work.
Although the four-stroke turbo engine lacks the raw power of the original two-stroke, the project captured the spirit and attitude of the RD 350. It demonstrated how the motorcycle’s influence still inspires builders to combine tradition with innovation.
The Custom Project Vision
Renato Frateschi and His Workshop
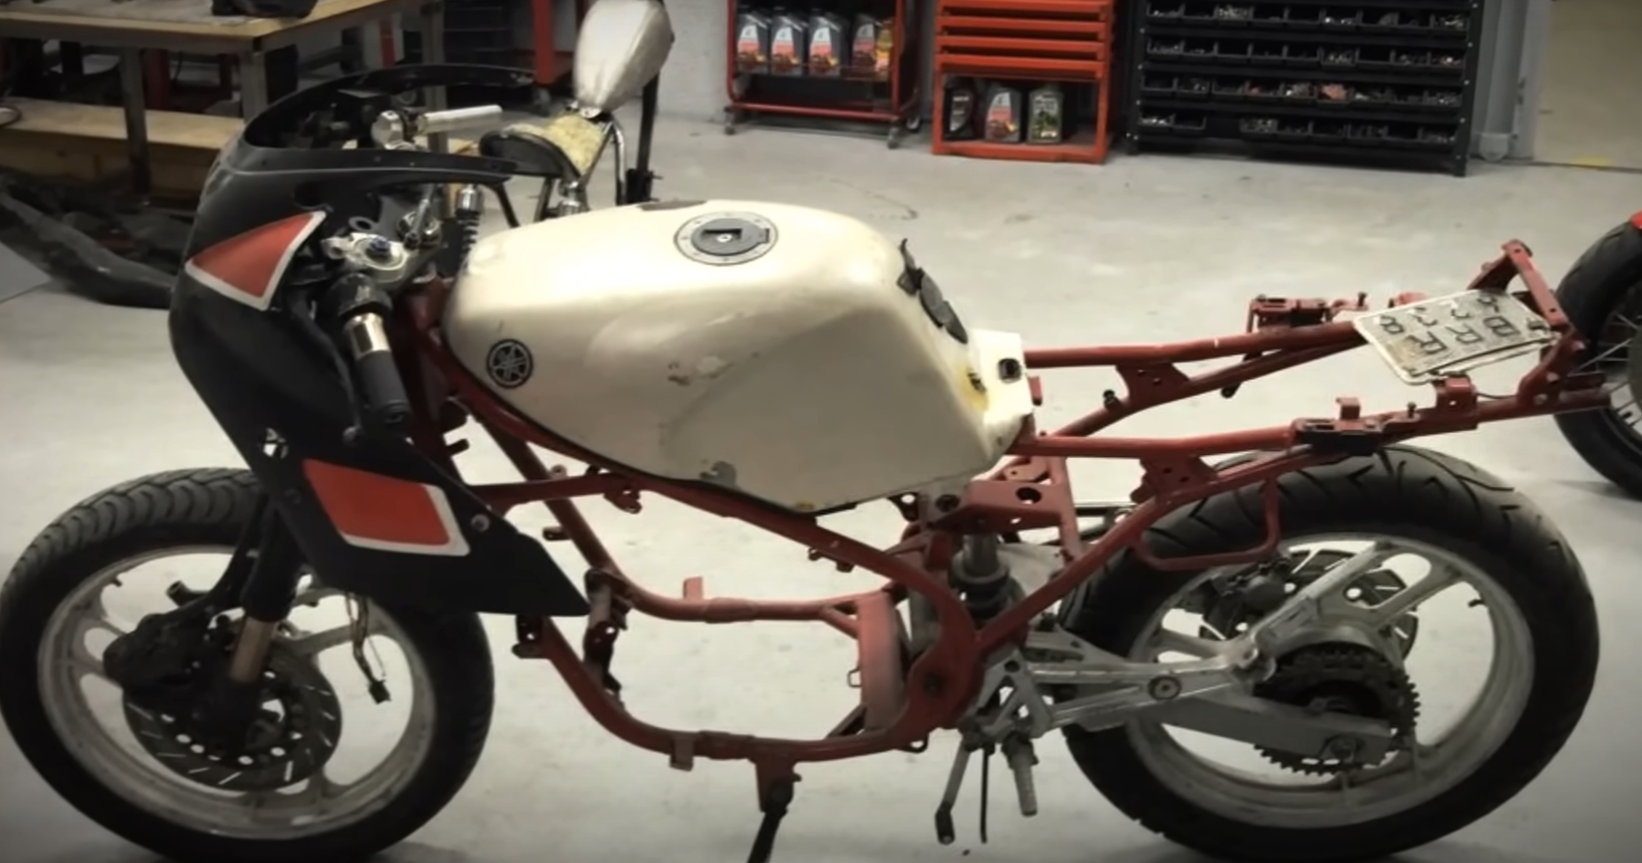
Renato Frateschi, owner of Frateschi Garage in Brazil, led this custom Yamaha project with precision and patience. The work began in 2022 when a client asked for a motorcycle that felt unique and modern. Renato suggested using a Yamaha RD as the base, even though only the fuel tank, frame, and wheels were available.
To stay within budget, he replaced the rare RD engine with one from a Yamaha R3. This new engine was heavier and less powerful, so he decided to add a turbo to boost performance. Adapting the R3 engine required frame modifications to handle the extra size and weight. Renato also reinforced the chassis to improve stability and safety.
He installed Brembo front brakes with 300 mm discs and used a Triumph Daytona 675 swingarm for better handling. The 17-inch wheels added agility and a wider stance. Many of these parts had to be custom-designed, 3D printed, and machined from aerospace aluminum, showing the high level of technical skill behind the project.
| Key Upgrades | Source/Method |
|---|---|
| Engine | Yamaha R3 (4-stroke) |
| Swingarm | Triumph Daytona 675 |
| Brakes | Brembo, 300 mm discs |
| Frame | Reinforced and modified |
| Components | 3D printed and CNC machined |
What Sparked the Build
The design took shape through 3D modeling, scanning, and augmented reality, allowing precise adjustments before fabrication. Renato printed both the rear section and semi-fairing using advanced 3D printers, which was uncommon at the time in Brazil.
The semi-fairing design reflected the first RD 350 produced in Brazil, which also featured a half fairing. This connection made the styling choice both practical and historically consistent. The final result looked like a modern RD 350, complete with dual headlights and a compact rear light with built-in turn signals.
Renato aimed to capture the spirit of the original RD while using modern technology and materials. Even though the ride could not fully match the raw feel of a two-stroke engine, the project achieved a strong balance between classic character and modern performance.
Engine Selection and Modifications
Selecting the Yamaha R3 Power Unit
Renato Frateschi began the project with only a few components: the frame, wheels, and fuel tank. Finding an original RD 350 engine proved difficult and expensive, so he chose the Yamaha R3 engine instead. The R3’s 4-stroke design offered reliability and modern performance, even though it was heavier and less powerful than the RD’s 2-stroke motor. This choice allowed the project to stay within budget while providing a solid base for further upgrades.
| Specification | RD 350 (Original) | R3 (Chosen Engine) |
|---|---|---|
| Type | 2-stroke | 4-stroke |
| Weight | Lighter | Heavier |
| Power | Higher | Lower |
| Availability | Rare | Common |
| Cost | High | Moderate |
Turbo System Implementation
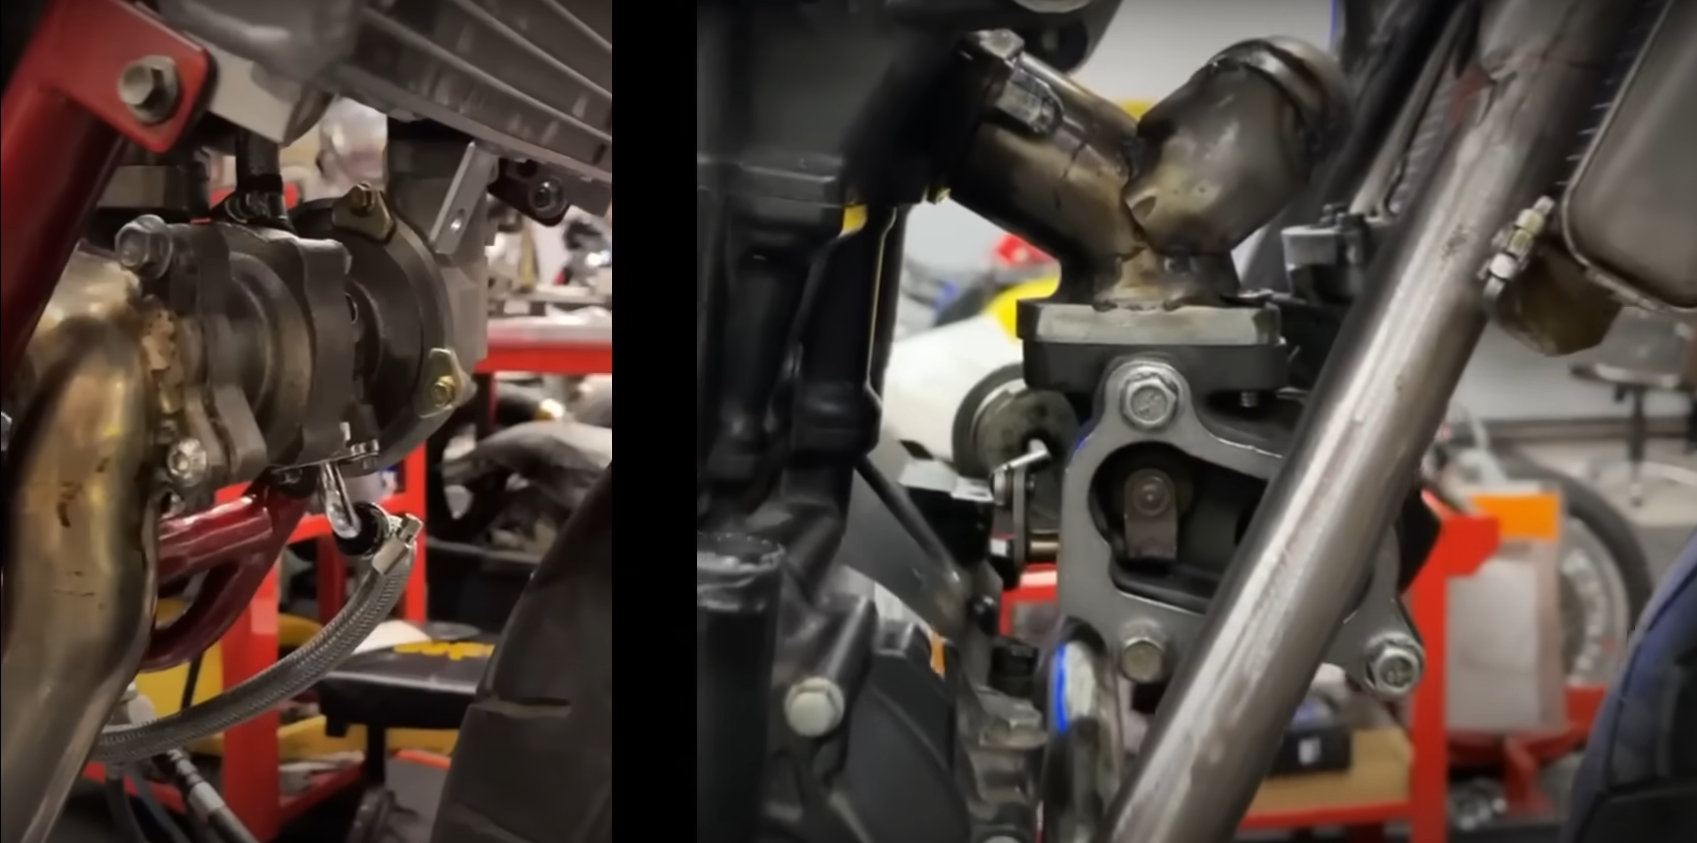
To enhance performance, Renato added a turbocharger to the R3 engine. This required the creation of several custom parts, all designed and produced in-house. Using 3D printing and CAD modeling, he developed the fittings and mounts needed to integrate the turbo system securely. The result was a cleaner and more efficient installation that balanced power gains with reliability.
Key fabrication tools:
- 3D printers for custom components
- CAD software for design precision
- Machined aluminum for strength and durability
Difficulties in Engine Installation
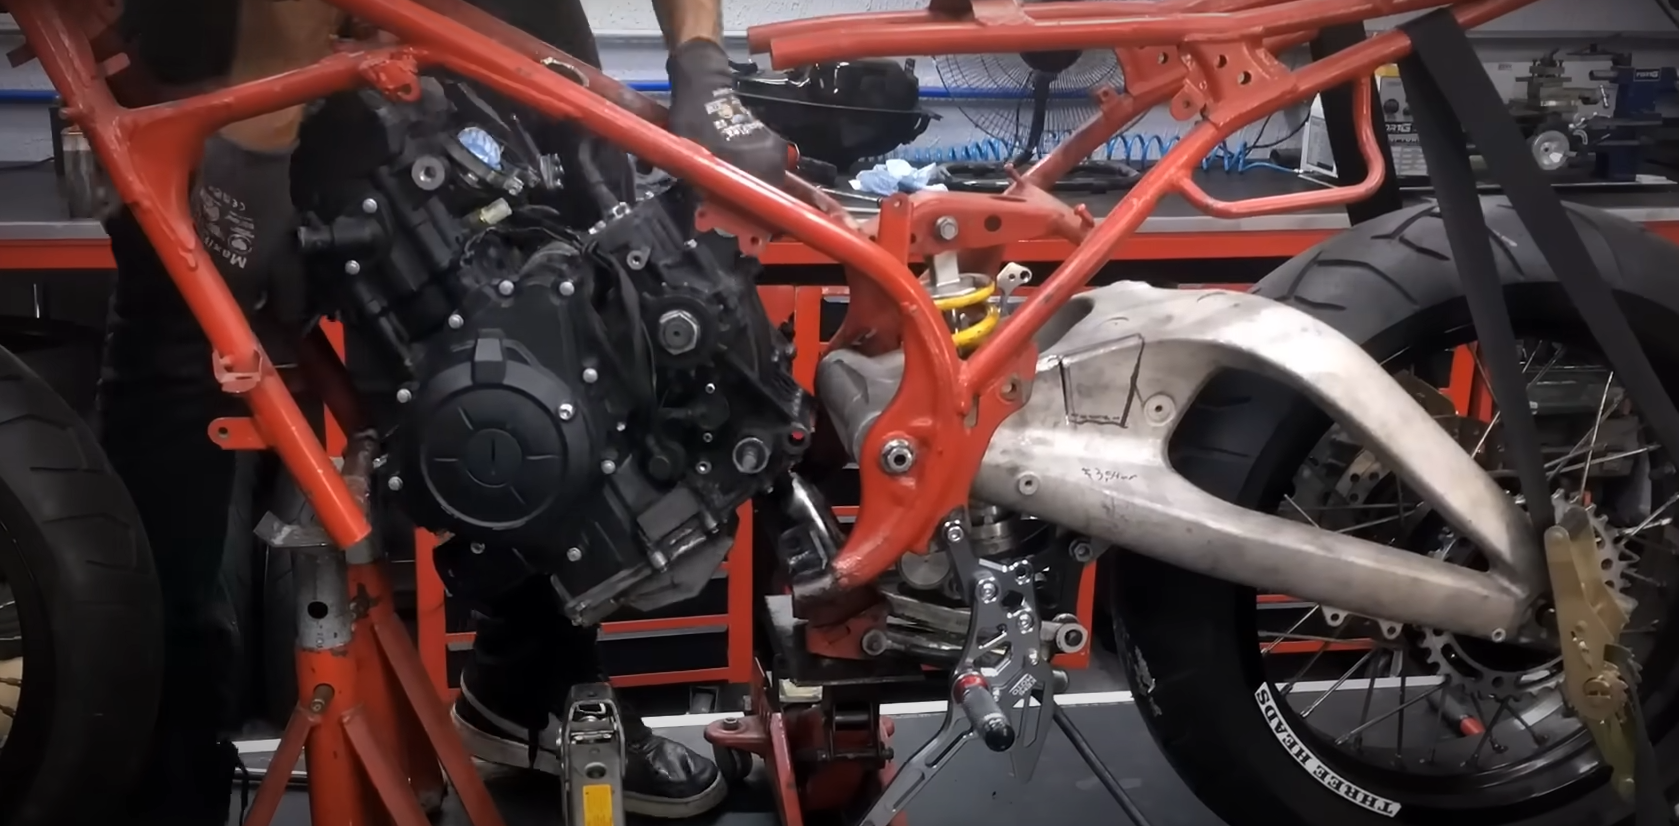
Fitting the R3 engine into the RD 350 frame was far from simple. The new engine’s larger size and added weight demanded modifications to the frame. Renato reinforced the structure to improve rigidity and safety while preserving the original lines.
He also upgraded several parts to handle the increased performance:
- Brembo front brakes with 300 mm discs
- Triumph Daytona 675 swingarm for better stability
- 17-inch wheels for improved agility
These adjustments ensured the motorcycle maintained proper balance and handling despite the engine swap and turbo addition.
Chassis and Frame Enhancements
Frame Strengthening and Structure Improvements
Renato redesigned the original frame to handle the extra weight and size of the R3 engine. The stock RD 350 frame was known for twisting under pressure, so he reinforced it without changing its overall shape.
He added structural supports to improve rigidity and ensure stable handling. This upgrade allowed the bike to handle modern components such as larger wheels and stronger brakes. The final structure kept the classic lines of the RD while improving safety and performance.
| Component | Modification | Purpose |
|---|---|---|
| Frame | Reinforced joints and tubing | Reduce flex and improve stability |
| Engine Mounts | Custom-fitted | Support heavier 4-stroke engine |
| Geometry | Maintained original proportions | Preserve classic RD appearance |
Suspension and Ride Control Upgrades
To match the stronger frame, Renato upgraded the suspension and handling system. A Triumph Daytona 675 swingarm replaced the old one, giving the motorcycle a more balanced stance and better traction. Adapting it required precise alignment with the Yamaha frame, but the effort paid off.
The 17-inch wheels improved cornering and agility compared to the original setup. Brembo front brakes with 300 mm discs provided reliable stopping power. A custom caliper mount, designed with CAD software and machined from aerospace aluminum, ensured perfect fit and function.
Key upgrades included:
- Wider wheels for improved grip
- Modern swingarm for better stability
- High-performance brakes for stronger control
Brake and Wheel Upgrades
Brembo Front Brake Setup
Renato equipped the motorcycle with Brembo front brakes that use 300 mm discs for stronger stopping power. He designed and produced the caliper mounts himself using CAD modeling, 3D printing, and aerospace-grade aluminum machining.
| Component | Process | Material |
|---|---|---|
| Caliper Carrier | CAD Designed & 3D Printed | Aerospace Aluminum |
| Brake Discs | 300 mm | Steel |
| Front Calipers | Brembo | — |
These upgrades improved braking precision and reliability while keeping the custom design consistent with the rest of the build.
Wider Wheel Setup and Swingarm Modification
The motorcycle now runs on 17-inch wheels, replacing the narrower originals. The wider wheels enhanced stability and cornering, giving the bike quicker handling.
Renato adapted a Triumph Daytona 675 swingarm to fit the Yamaha frame. The adjustment required careful alignment, but the overall length of the motorcycle stayed nearly the same.
Key improvements:
- Wider wheels for better grip
- Stronger swingarm from a modern sportbike
- Maintained original frame proportions
These changes balanced the extra weight of the new engine and boosted the bike’s agility and control.
Innovative Use of 3D Printing
Creation and Building Process
Renato Frateschi used 3D printing to shape several custom parts for his Yamaha project. He designed the rear section and fairing using digital models, scanners, and augmented reality tools to visualize the final form before printing.
He printed both small and large components, testing different materials and shapes until he reached the desired strength and finish. The rear light and integrated turn signals were also part of this printed design, giving the motorcycle a clean and modern appearance.
| Component | Fabrication Method | Material | Purpose |
|---|---|---|---|
| Caliper Carrier | 3D printed + machined | Aerospace aluminum | Mount Brembo brakes |
| Rear Section | 3D printed | Composite filament | Lightweight bodywork |
| Fairing | 3D printed | Reinforced polymer | Aerodynamic styling |
Solving Design and Engineering Issues
Printing large parts that could handle stress, torsion, and heat was a major challenge. Two years earlier, few printers in his region could manage this level of complexity. Renato experimented with different printer settings and materials until the parts met his standards for durability.
He also faced alignment issues when adapting parts like the Triumph swingarm and Yamaha frame. By using CAD modeling and precise 3D prints, he created accurate fittings and mounts. These tools helped him refine the geometry and ensure the motorcycle kept its balanced proportions.
Through this process, he improved his technical skills and set a foundation for future custom builds that combine traditional mechanics with advanced digital fabrication.
Modern Styling and Finishing Touches
Design Choices
Renato Frateschi gave the motorcycle a bold and modern look while keeping the lines of the classic RD 350. He replaced the original bodywork with parts made using 3D printing, including the rear section and semi-fairing. This method allowed him to test shapes and fitment with precision before final assembly.
He used 3D scanners, modeling software, and augmented reality to visualize how each part would appear on the finished bike. These tools helped him refine the design until it matched the client’s expectations. The result is a bike that looks factory-built but with a sharper, more aggressive stance.
| Feature | Technique Used | Result |
|---|---|---|
| Body panels | 3D printed | Lightweight and custom fit |
| Frame lines | Reinforced and retained | Stronger yet classic shape |
| Paint scheme | Modern interpretation | Reflects the RD heritage |
Lighting and Fairing Design
The front fairing keeps a semi-covered style that connects to the first RD 350 models produced in Brazil. This choice gives the motorcycle a sense of continuity while adding a modern touch. Two compact headlights sit in front, creating a clean and assertive appearance.
At the rear, a minimalist taillight combines brake and turn signal functions in one piece, keeping the design simple and neat. The fairing and lighting layout balance old-school inspiration with up-to-date materials and technology, giving the bike a distinct modern identity.
Performance and Riding Experience
Comparison with the Classic RD 350
The original RD 350 earned its fierce reputation for being light, fast, and difficult to handle. This new version keeps the spirit but uses a Yamaha R3 four-stroke engine instead of the original two-stroke. The change made the bike heavier but also more reliable and easier to maintain.
To recover some lost power, the builder added a turbocharger, giving the R3 engine a stronger response. The frame was reinforced to handle the extra weight and power, keeping the same general shape but improving stability. The 17-inch wheels and Brembo front brakes with 300 mm discs add control and stopping strength that the old RD never had.
| Feature | Classic RD 350 | Custom Build |
|---|---|---|
| Engine Type | 2-stroke | 4-stroke (R3) with turbo |
| Frame | Original, flexible | Reinforced for rigidity |
| Wheels | Narrow | 17-inch, wider |
| Brakes | Basic | Brembo, 300 mm discs |
Handling and Ride Feel
The modified frame and suspension give the motorcycle a more balanced and secure ride. The Triumph Daytona swingarm adds precision when cornering, while the wider tires increase traction.
Even though the turbocharged R3 engine cannot fully match the sharp reaction of the old two-stroke, it still delivers an engaging and smooth power curve. The improved geometry and stronger components make it easier to control, especially at higher speeds.
The result is a motorcycle that blends modern reliability with the classic energy that made the RD 350 so memorable.
Project Results and Next Steps
Key Takeaways
Renato Frateschi’s custom Yamaha project showed how creative design and practical engineering can work together. He replaced the original RD 350 engine with a Yamaha R3 motor to meet cost and availability limits, then added a turbo to boost performance.
He reinforced the frame to reduce torsion and improve handling. The use of 3D printing, CAD design, and augmented reality allowed him to build and test unique parts like the fairing, tail section, and brake components. These methods saved time and improved accuracy.
Renato discovered that adapting a modern engine to a vintage frame required constant adjustment. The process taught him how to balance weight, structure, and power while maintaining the original character of the bike.
| Component | Modification | Purpose |
|---|---|---|
| Frame | Reinforced and reshaped | Improve stability |
| Engine | Yamaha R3 with turbo | Increase power |
| Swingarm | From Triumph Daytona 675 | Enhance suspension |
| Brakes | Brembo with 300 mm discs | Improve stopping power |
| Bodywork | 3D printed | Reduce weight and allow custom design |
Future Builds
Renato plans to apply what he learned to upcoming motorcycles. He aims to refine 3D printing for structural parts, improve engine integration, and further test augmented reality modeling for client previews.
His next build will likely continue blending modern technology with classic design. The focus will stay on precise engineering, strong performance, and a clean factory-style finish that respects the legacy of the original RD 350.