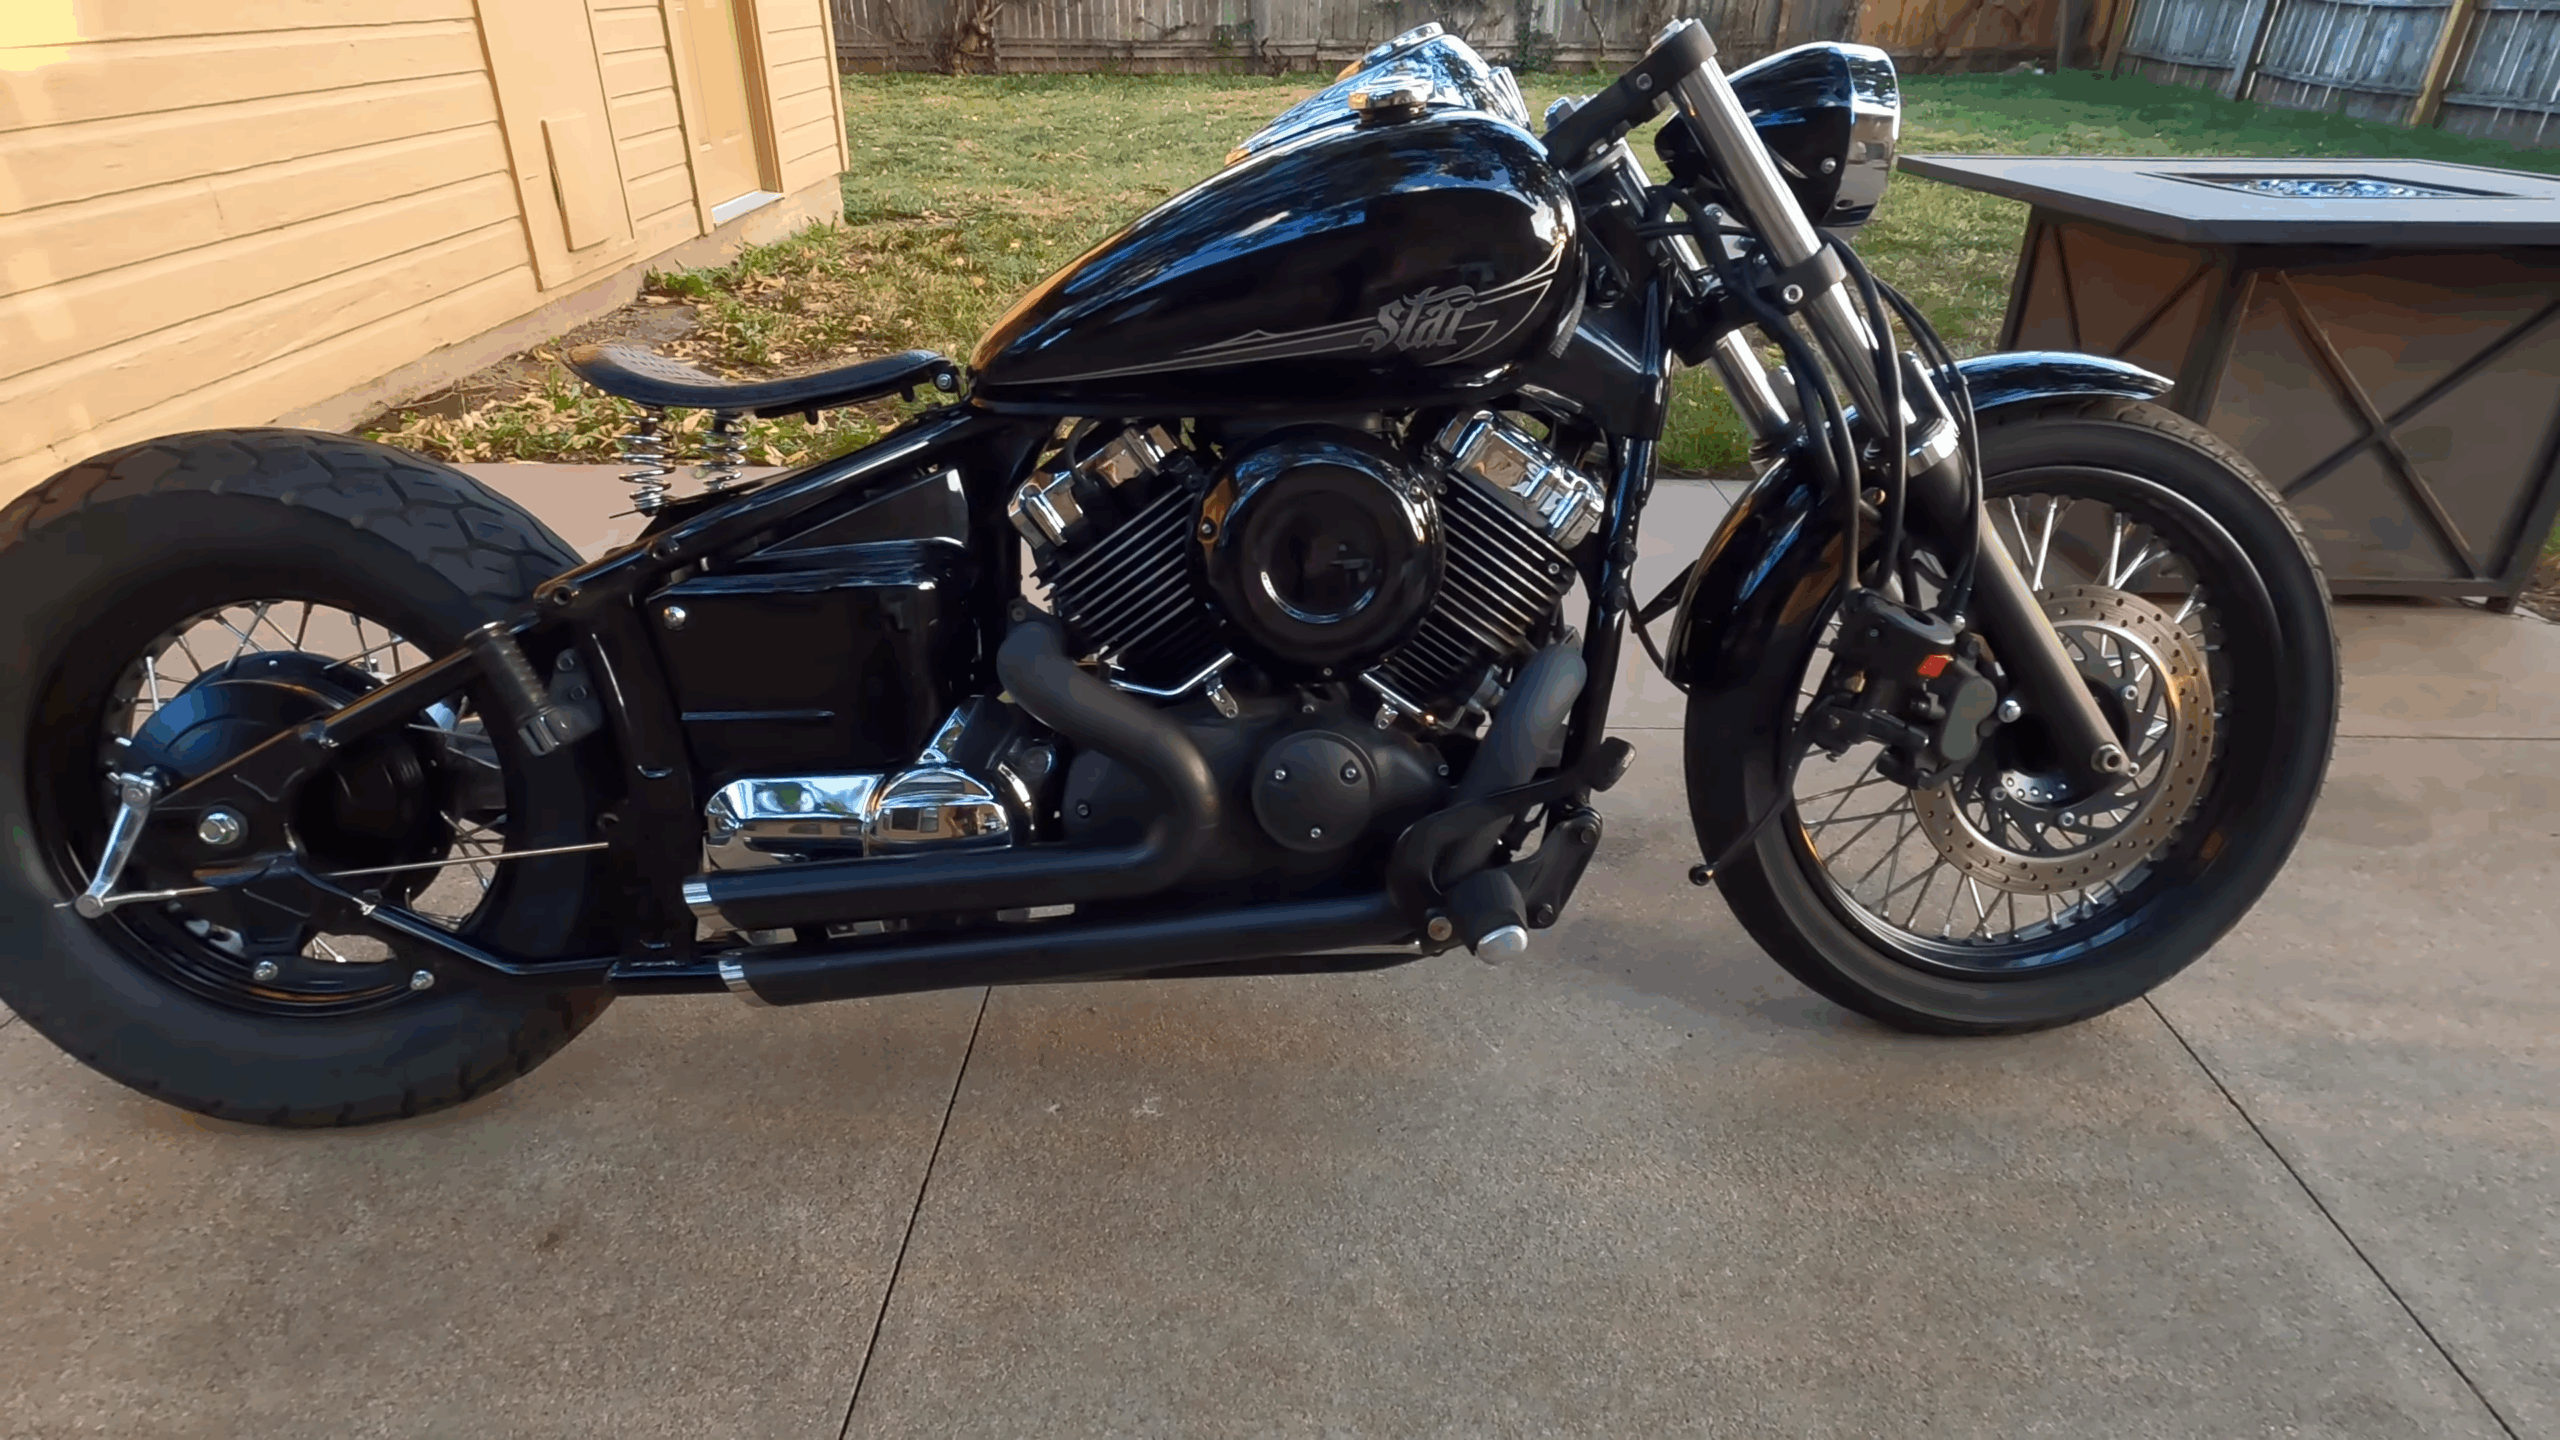
You are about to turn a 2015 Yamaha V Star 650 into a clean, stripped-down bobber. You start with a solid platform that uses an air‑cooled engine and shaft drive, which makes the bike simple and dependable. That strong base lets you remove the extra parts and shape the bike into something lower, lighter, and more personal.
You will use universal parts, basic tools, and some hands-on problem solving to make everything fit. You remove factory pieces, test new parts, and adjust as needed until the bike takes on its new form. You focus on smart changes that improve the look, reduce weight, and still allow you to return the bike to stock if you choose.
Key Takeaways
- You choose a simple and reliable cruiser as the base for a custom build.
- You remove factory parts and fit universal components with careful planning and hands-on work.
- You reduce weight, reuse parts wisely, and shape the bike into a clean solo setup.
Picking the Best Yamaha V Star 650 for Your Bobber Project
Proven Durability and Simple Design
You want a bike that works every time you hit the starter. The V Star 650 gives you that with its air-cooled engine and shaft drive. You avoid extra complexity, and you get a setup that stays straightforward and easy to manage.
You also get a layout that makes sense. The design stays simple, which helps when you start removing parts and changing the look. You do not fight the bike while you build it.
On this platform, you can unbolt the rear section without cutting the frame. That saves time and keeps your options open if you ever want to return it to a two-seat setup.
Key features you work with:
- Air-cooled V-twin engine
- Shaft-driven rear end
- Bolt-on rear subframe section
- Clean, basic frame layout
Why This Bike Works So Well for Custom Builds
You can strip this bike down fast. Start at the back, remove the factory seat, rear fender, lights, and signals, and the frame already looks ready for a bobber stance.
When you step back and look at the bare frame, you see strong cross members that give you solid mounting points. You can drill and bolt your solo seat bracket right to the frame. You shape and bend the seat pan as needed, then line it up with the existing holes in the cross members.
You do not get step-by-step instructions with universal parts. You use basic tools, adjust the seat pan, drill your mounting holes, and make it fit your frame. Every bike sits a little different, so you rely on your judgment and fit everything by hand.
The V Star 650 gives you room to:
- Run a solo bobber seat with springs
- Mount a license plate and tail light to the swingarm axle
- Install clip-on handlebars for a low stance
- Remove parts without cutting the main frame
You can build it the way you want. The frame shape, tank position, and cross members give you enough structure to mount custom parts without heavy fabrication.
Mapping Out Your Bobber Build
You start with a solid base. The 2015 V Star 650 gives you an air‑cooled engine and a shaft drive, which keeps the setup simple and reliable. That makes it a strong platform for a stripped-down bobber.
You order a stack of universal parts and plan to make them work. You do not rely on instructions. You use basic tools, clear steps, and a bit of creativity to shape everything to your bike.
Choosing Universal-Style Bobber Components
You pick generic, universal parts so you can shape the bike the way you want. You do not limit yourself to one style.
Your main parts include:
- Solo bobber seat with spring mounts
- Clip-on handlebars for a low riding position
- 1-inch grips to match the bars
- Swingarm-mounted license plate bracket with built-in tail light
You understand that universal parts rarely bolt on without changes. You expect to bend, drill, or trim pieces so they fit your frame.
You also know every bike differs in:
- Tank shape and mounting points
- Rear frame layout
- Suspension setup
- Drivetrain design
You build around what your frame gives you. On this V Star 650, the rear section unbolts cleanly, so you do not need to cut the frame. That lets you return the bike to stock later if you keep your original parts.
You remove factory seats, rear fender, lights, signals, handlebars, and other parts you do not need. You clear the bike down to the core so you can see the final shape before mounting new parts.
Creating a Clear Build Plan
You work from the back of the bike toward the front. That keeps the process organized and easy to manage.
You test-fit each part before drilling or mounting anything. For the solo seat, you:
- Hold the seat pan in place
- Check the angle against the tank and frame
- Adjust bends in the base plate
- Flatten wing tabs if needed
- Mark exact mounting points
You modify the seat pan so it sits level and follows the frame lines. You remove unwanted bends and flatten tabs using simple tools. You drill mounting holes only after you confirm alignment with the frame cross members.
Your approach stays direct:
- Position the part.
- Adjust the metal to match the frame.
- Mark mounting points.
- Drill and secure.
You accept that there are no step-by-step instructions. You rely on fitment checks and small adjustments until everything lines up.
You build the bike to match your vision. You treat this process as a guide, not a strict formula, and shape each part to fit your motorcycle.
Taking Off the Original Parts
Removing the Factory Seat and Rear Fender
You start at the back and work your way forward. You remove the stock seats first, along with the bar you added earlier.
Next, you unbolt the subframe and pull off the rear fender. You also take off the rear turn signals and tail light. All of that comes off because you will not reuse it on this build.
When you remove the subframe, you notice something important. The frame ends cleanly, so you do not need to cut it. On this V 650, you simply unbolt the rear section instead of using a saw.
That means you can save every part you remove. If you ever want to return the bike to a two-seat setup, you can bolt everything back on.
Parts removed from the rear:
- Stock seats
- Rear fender
- Rear turn signals
- Tail light
- Subframe
You set all these parts aside so you can box them up later.
Removing the Stock Handlebars and Front Signals
After clearing the rear, you move to the front of the bike. You remove the factory handlebars, grips, and controls.
You also take off the front turn signals. This build will not use turn signals.
With the bars and signals gone, the top of the bike opens up. You can now picture where the clip-on handlebars will sit and how low the front end will look.
At this stage, you have stripped off every factory part that you plan to replace. The bike now shows a clear outline of the bobber direction you are building toward.
Fitting the Solo Bobber Seat
Shaping the Seat Base Plate
You start with the metal base plate that comes with the solo seat. It has a small bend in it, two rear studs for the springs, a front hole, and small side tabs.
When you hold it on the frame, you see the angle does not match the bike. You need to flatten that bend so the plate sits level in the spot you want, with the front tongue sliding slightly under the tank.
Set the plate on rags on the ground and press it flat with steady pressure. Use pliers or channel locks with a rag to bend the side tabs so they sit straight and flush with the top of the plate.
Once you remove those bends, the plate lines up much better with the frame rails and cross members.
Drilling and Positioning the Mounting Points
You choose the front cross member between the frame rails as your front mount. Mark the exact spot, then drill a clean hole through that cross member.
With the plate in position, run a bolt through the front to hold it in place. This locks in your front mounting point.
For the rear, use the existing hole in the rear cross member. With the plate bolted in the front, mark the underside of the plate where it lines up with that rear hole.
Remove the plate and drill a hole at your mark. Set the plate back in place and run a bolt through the rear hole into the frame. Now the pan sits secure at both mounting points.
Attaching the Springs and Seat Hardware
The seat itself has two rear studs for the springs and two front studs for the hinge bracket. Install the front bracket onto the seat using the supplied washers and nuts.
Slip the springs over the rear studs on the seat. The springs will later sit over the matching studs on the base plate.
Tighten the nuts and washers so the springs stay in place but still allow movement. With the front and rear bolts in place and the springs aligned, the solo seat mounts solid to the frame and follows the lines of the bike.
Refreshing the Rear Light and Plate Mount
You remove the stock rear light and signals, so you need a new way to run the brake light and hold the plate. I use a universal plate bracket that has a built-in tail light. It mounts at the rear axle on the swing arm.
This part does not come with instructions. You make it work with simple tools and careful fitting.
Connecting the Wires to the Bike
You route the new tail light wires toward the factory harness. The original rear light wiring stays on the bike after you strip the fender.
Match the ground, running light, and brake light wires from the new unit to the bike’s harness. Keep the wiring clean and tight along the frame.
- Use solid connections
- Secure the wires so they do not rub
- Keep them away from moving parts
You check the brake and running light before you button everything up. Make sure both functions work as they should.
Securing the Bracket to the Rear Axle
You position the license plate bracket at the swing arm axle bolt. The bracket slides into place at that mounting point.
Line it up so the plate sits straight and clears the wheel. Then tighten the axle hardware back down to lock it in place.
This setup keeps the rear clean and simple. It fits the stripped-down look and removes the bulky factory fender and light assembly.
Installing Low Clip-On Bars and New Grips
Dropping the Fork Tubes for Bar Mounting
You mount the clip-on handlebars directly to the fork tubes. To do that, you loosen the upper triple tree and lower the forks slightly so the bars can slide into place.
You set the clip-ons at the height you want, which keeps the front end low. This setup gives you that low, stretched look you’re after on a bobber build.
Make sure both sides sit at the same height. Tighten everything evenly so the bars stay secure and aligned.
Mounting the Controls and Grips
You slide the 1-inch grips onto the new clip-on bars. These universal grips fit the bars you ordered, so they go on without special adapters.
Next, you reinstall the throttle, clutch lever, and front brake controls. You position each control so your hands rest naturally when you sit on the bike.
Adjust the angle before you tighten the clamps. Once everything feels right, lock it down so nothing shifts while you ride.
Adjusting Cable Routing for Smooth Operation
After you lower the bars, you check all cables and lines. The new position changes their path, so you reroute them as needed.
Make sure the throttle cable moves freely from lock to lock. Do the same for the clutch cable and front brake line.
Turn the bars fully left and right and confirm nothing binds or pulls tight. Clean routing keeps your controls smooth and reliable.
Final Setup and Detail Work
Locking Every Part in Place
You bolt the seat plate to the frame once you drill the front and rear holes. The rear bolt runs through the cross member with the factory hole, and the front bolt passes through the new hole you drilled. Tighten both so the plate sits firm and flat.
You attach the seat to the plate using the front hinge bracket and the two mounting studs under the seat. Then you install the rear springs over the studs and secure them with washers and nuts. Make sure the seat moves as it should but does not shift side to side.
You mount the clip-on handlebars onto the forks and set them at the height and angle you want. Slide on the 1-inch grips and reinstall the controls so everything lines up and feels natural in your hands.
You position the swingarm-mounted license plate bracket on the axle bolt. Secure it so the plate and integrated tail light sit straight and tight.
Keeping the Wiring Clean and Tidy
You remove the turn signals and any extra lighting you do not plan to use. That leaves fewer wires to manage and keeps the bike stripped down.
Route the remaining wires along the frame so they stay out of sight. Follow the frame rails and secure the wiring so nothing hangs loose or rubs against moving parts.
Check that the tail light wiring reaches the new license plate mount without tension. Keep the runs short and direct to match the clean bobber look.
Budget and Parts Weight Reduction
### Full Parts Cost Breakdown
You source simple, universal bobber parts from eBay to keep this build affordable. You choose generic components instead of custom-made pieces.
Parts used:
- Universal solo bobber seat (black alligator texture)
- Seat base plate with springs and mounting hardware
- Clip-on handlebars
- 1-inch grips
- Swingarm-mounted license plate bracket with integrated tail light
You use affiliate links for these items. When someone buys through those links, you receive a small commission. You can choose different parts if you want a different look. You are not locked into this exact setup.
### Measuring the Weight You Cut
You remove the factory seats, rear fender, turn signals, tail light, handlebars, grips, controls, and other stock parts. You also plan to include the factory exhaust in the removed pile.
You keep every part you take off. At the end, you place them all in a box and weigh them.
This lets you see exactly how much weight you removed during the bobber conversion. You focus on real numbers by weighing the stock parts instead of guessing.
Selling the Stock Parts You Remove
Posting Your Take-Off Parts Online
After you strip the bike down, you will have a solid stack of factory parts sitting on the floor. You remove the seats, rear fender, turn signals, tail light, handlebars, grips, controls, and even the exhaust.
You can box up everything you take off and list it for sale online. I use eBay, and I share affiliate links for the parts I buy. You can do the same when you sell your stock components.
List each item clearly and separate them so buyers know exactly what they get. Common parts you can sell include:
- Factory seats
- Rear fender
- Turn signals
- Tail light
- Handlebars and grips
- Controls
- OEM exhaust system
Keep your hardware together and label it. That makes shipping easier and helps avoid confusion.
Getting the Most from Your Original Components
You do not have to cut the frame on this V Star 650. You simply unbolt the rear section. That means you can save every stock part and return the bike to a two-seater later if you want.
That also protects the value of your original components.
When you keep the take-off parts in good shape, you give yourself two clear options:
| Option | What You Can Do |
|---|---|
| Reinstall later | Convert the bike back to stock form |
| Sell separately | Recover some of your build cost |
You can also weigh the removed parts together, including the exhaust, to see how much weight you dropped. That gives you a clear view of what changed during the build.
If you stay organized and keep everything intact, you turn your leftover factory parts into useful assets instead of scrap.
Complete Bobber Build Overview
You take a 2015 V Star 650 and strip it down to the core to shape a clean bobber. You start with a solid base: an air‑cooled engine and a shaft drive that keep the design simple and dependable.
You order universal parts and plan to make them fit your bike.
Parts used in this build:
- Universal solo bobber seat
- Clip-on handlebars
- 1-inch grips
- Swingarm-mounted license plate bracket with built-in tail light
You remove the factory seats, rear fender, tail light, turn signals, and installed crash bar. Then you move forward and pull the bars, grips, controls, and front signals. You do not run turn signals on this setup.
When you unbolt the rear subframe, the frame ends cleanly. You do not need to cut it. That saves time and lets you return the bike to a two-up setup later if you keep the stock parts.
After stripping the bike, you lay out everything you removed. You plan to box it up and weigh it, along with the factory exhaust, to see how much weight you dropped.
Solo Seat Setup and Mounting Plan
You work with a bobber seat kit that includes:
| Component | Details |
|---|---|
| Base plate | Slight bend, front mounting hole, rear spring studs, side tabs |
| Seat | Two front studs, two rear studs for springs |
| Springs | Mount to rear studs with washers and nuts |
The seat uses a front hinge-style mount and rear springs. The texture is a black alligator pattern, which adds a unique look.
You test-fit the base plate and see the bend does not match the frame. You flatten the plate by stepping on it over rags. You straighten the side tabs with pliers and channel locks.
For mounting:
- You drill a hole in the front cross member to secure the front of the plate.
- You use an existing hole in the rear cross member to mount the back.
- You mark the plate carefully before drilling to line it up with the frame hole.
This approach keeps the seat low and aligned with the tank. You rely on simple tools and careful measuring to make universal parts fit your specific frame.