Building a custom motorbike is a detailed process that requires careful planning from the start. The builder begins by imagining how the bike will look and function, focusing on both design and practical needs for long journeys. Each part, from the luggage options to engine modifications, is chosen to create a bike that fits specific touring needs and overcomes common challenges riders face on the road.
During the build, the bike is taken apart and updated with new parts such as storage solutions, protective gear, and improved performance features. Thoughtful upgrades focus on comfort, safety, and better handling, ensuring the finished bike is ready for adventure and long-distance touring.
Key Takeaways
- The project starts with a solid visualization and planning phase.
- Upgrades and component choices are made for better touring performance.
- The build involves both disassembly, engine changes, and final reassembly.
Project Overview
Main Focus and Purpose
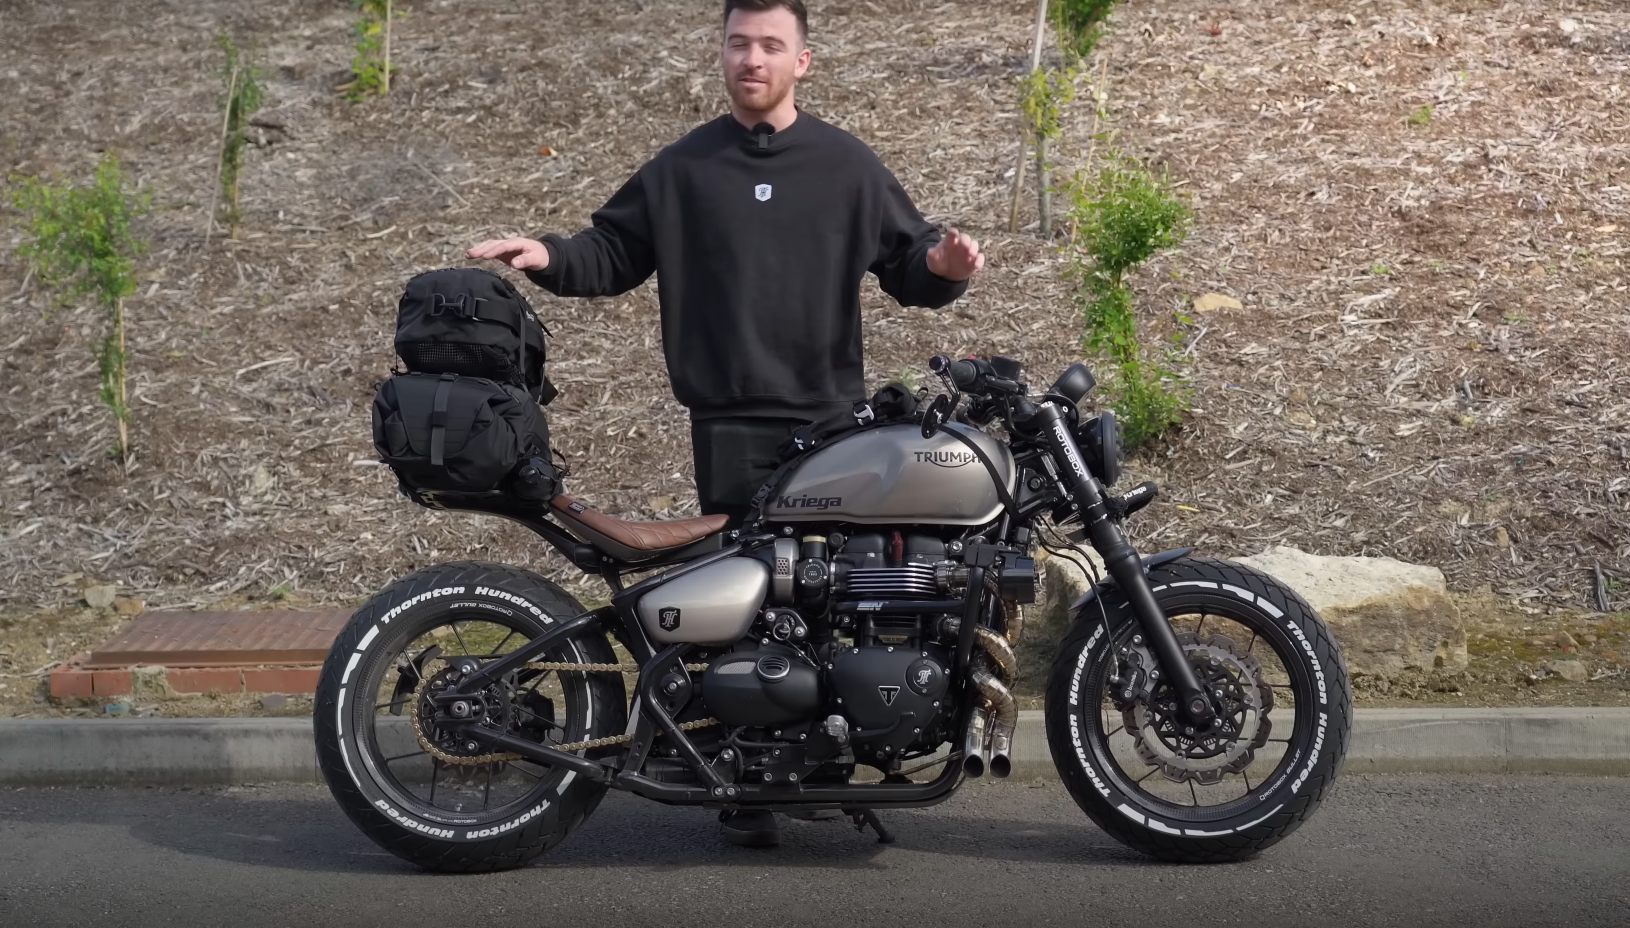
This project involves customizing and upgrading a personal motorbike to fit specific travel and performance needs. The bike is being equipped with various luggage solutions and safety features. These improvements are aimed at making the bike more suitable for long-distance trips and adventure riding.
- Added Luggage: Multiple Kriega bags (US-5, US-20, US-40) for efficient storage
- Lighting: Auxiliary lights for better visibility in tunnels and at night
- Engine and Frame Mods: Protective engine guards, improved exhaust, gold chain, and high-lift cam for better performance
- Durability: Carbon wheels and impact-resistant mirrors for safer and longer journeys
Key Benefits:
- Easier organization during travel
- Better protection for both rider and bike
- Enhanced engine performance
- Adaptable setup for various touring conditions
Reasons for Choosing This Motorbike
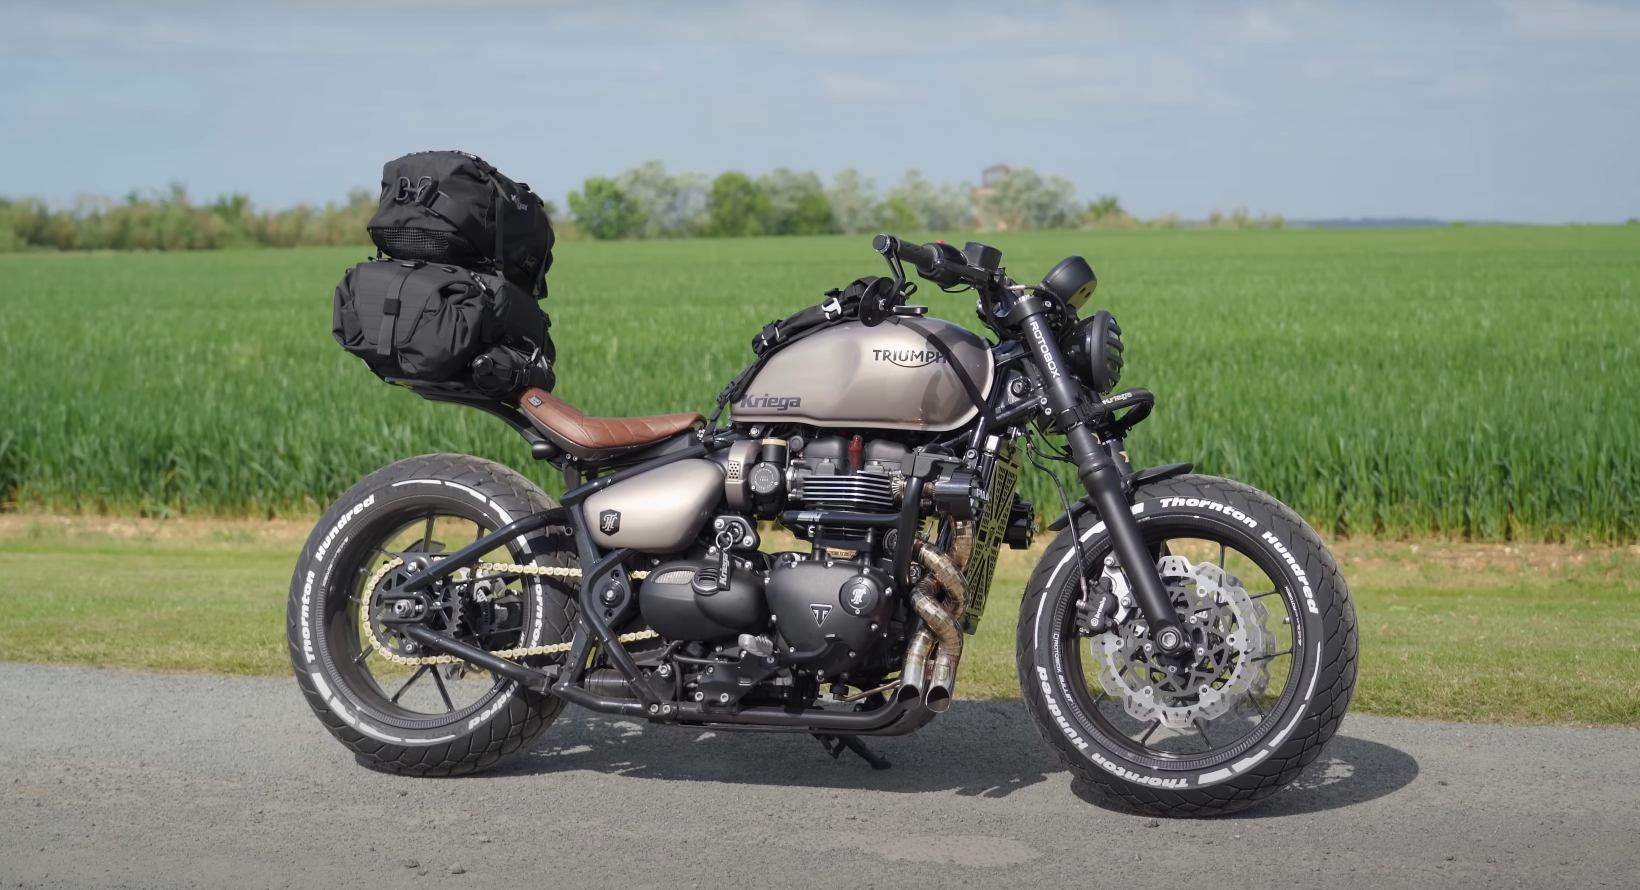
The selected bike is a Bobber Black from 2019. The choice was made to avoid putting high mileage on a new motorcycle and to take advantage of some unique features of this older model.
| Feature | Reason for Selection |
|---|---|
| Heavier Crankshaft | Improved torque for tight corners |
| 9-liter Tank | Planning to swap for longer rides |
| Used Bike | Less concern about adding many miles |
| Strong Frame | Good base for adventure modifications |
Other modifications, such as custom paint in BMW champagne quartz and special tires, were chosen for both style and function. The aim is to build a lightweight touring and adventure bike that can handle a variety of road and trail situations while keeping reliability and comfort in mind.
Early Steps and Visual Concepts
Approach to Building
The builder started by planning out how the bike would change from its basic version. They used a big screen and an iPad in their sales area to help picture each modification. The main focus was on adding special parts for touring, such as extra bags and lighting. The process included checking out a standard bike and then choosing specific upgrades one by one.
They listed what would be added, including a tank bag for convenience, engine guards for safety, and a new exhaust for better sound. The builder made clear decisions about each part based on what would be most useful during long rides. Special consideration was given to the color and style details, like custom paint and unique logos for a more personal look.
| Feature | Purpose |
|---|---|
| Tank Bag | Store travel items easily |
| Aux Lights | Extra visibility for night/tunnels |
| Engine Guards | Protect engine if dropped |
| Luggage System | Pack clothes and gear |
| Custom Paint | Personal appearance |
| Special Tires | More miles, better grip |
Tailoring Choices
Each modification was chosen to meet specific travel needs. The bike’s base model was selected for its strong engine and ability to handle long distances. The tank was swapped for better range. Gears, tires, and suspension were carefully selected for both comfort on the road and toughness for adventure riding.
Waterproof luggage, unique mirrors, and light wheels were picked for practical reasons, like keeping belongings dry and making repairs easier. Adjustments were made for personal riding habits and past experiences, especially to solve problems faced during earlier trips.
Main custom features added:
- Luggage racks and bags for organization
- Upgraded exhaust for performance and sound control
- Durable wheels for easy maintenance
- Mirrors designed to prevent breakage
- A new cam for better power and speed
All changes were planned to build a bike that fits the builder’s needs for both everyday use and longer tours, with a strong focus on reliability and comfort.
Making the Bike Better
Comfort for Long Rides
Adding new parts focused on making the bike more comfortable for long trips. A new windscreen keeps the wind off the rider, and extra strap-on features help personalize the setup for different journeys. A special front pull loop also gives an easy way to move the bike in tight spots.
Packing Gear and Storage
Extra luggage has been attached to help carry more on trips. There is a tank bag for quick access to things like a passport or gloves. A rack system on the back holds bags in different sizes (like a US-20 and US-40) for clothes and tents. A smaller dry pack goes up front for smaller items, helping keep everything organized.
| Bag Type | Where It Goes | What It Holds |
|---|---|---|
| Tank Bag | Fuel Tank | Small essentials |
| Dry Pack | Front | Clothes, extras |
| Large Bag | Rear Rack | Tent, spare gear |
Better Lights and Engine Safety
Auxiliary lights are added to help with riding at night or in tunnels. Tough engine guards protect the engine if the bike tips over.
- Auxiliary lights: More visibility
- Engine guards: Shields engine from damage
Exhaust and Engine Noise
A new twisted exhaust pipe has been fitted. This setup creates more sound under hard acceleration but stays quiet when riding gently. The exhaust helps boost the bike’s power with a better airflow.
Looks and Small Details
Mirrors that fold and tough, sporty tires are installed to make the bike look sharper and handle better. Carbon wheels, strong and light, improve the ride while being ready for minor fixes on trips.
Custom Features and Paint
Custom logos and details are added, like unique side panel badges and the Kriega brand mark. The chosen color is BMW champagne quartz, picked for its uniqueness and how it looks in sunlight. A gold chain update gives the bike a touch of style and strength.
Choosing Parts
Kriega Luggage Options
The bike is fitted with a full range of Kriega bags. There is a tank-mounted bag for easy access to small essentials like a passport, gloves, or helmet while traveling. On the back of the bike, both a US-40 and US-20 bag are stacked, with the larger bag carrying bulkier items and the smaller bag on top for extra clothing. An additional US-5 dry pack is attached at the front for things that need to stay totally dry. All the bags mount securely and keep gear organized while touring.
Bag Placement Table
| Bag Name | Position | Main Use |
|---|---|---|
| US-5 Dry Pack | Front | Dry essentials |
| US-20 | Rear/Top | Clothes |
| US-40 | Rear/Bottom | Main luggage |
| Tank Bag | Tank | Quick access |
Tyre and Wheel Upgrades
The bike is equipped with carbon wheels previously used in lightweight builds. These wheels are tubeless, making it quicker and easier to repair punctures while on the road. The tyres chosen are sport-touring type with plenty of tread, ideal for long rides and variable road conditions.
Wheel Features:
- Carbon construction
- Tubeless tire setup
- Designed for toughness and reliability
Protection for Mirrors and Glass
Special mirrors from Motogadget have been added. These mirrors are more resistant to damage from stones or accidental bumps. Their design helps prevent loss of visibility if there is a minor impact, offering more durability for touring and off-road conditions.
Changes to Gearing
The gearing has been adjusted by using different sprockets and a gold chain. This setup is chosen for better acceleration out of tight corners, especially on winding roads. The new chain and gears help the bike handle steeper grades and give faster response when needed.
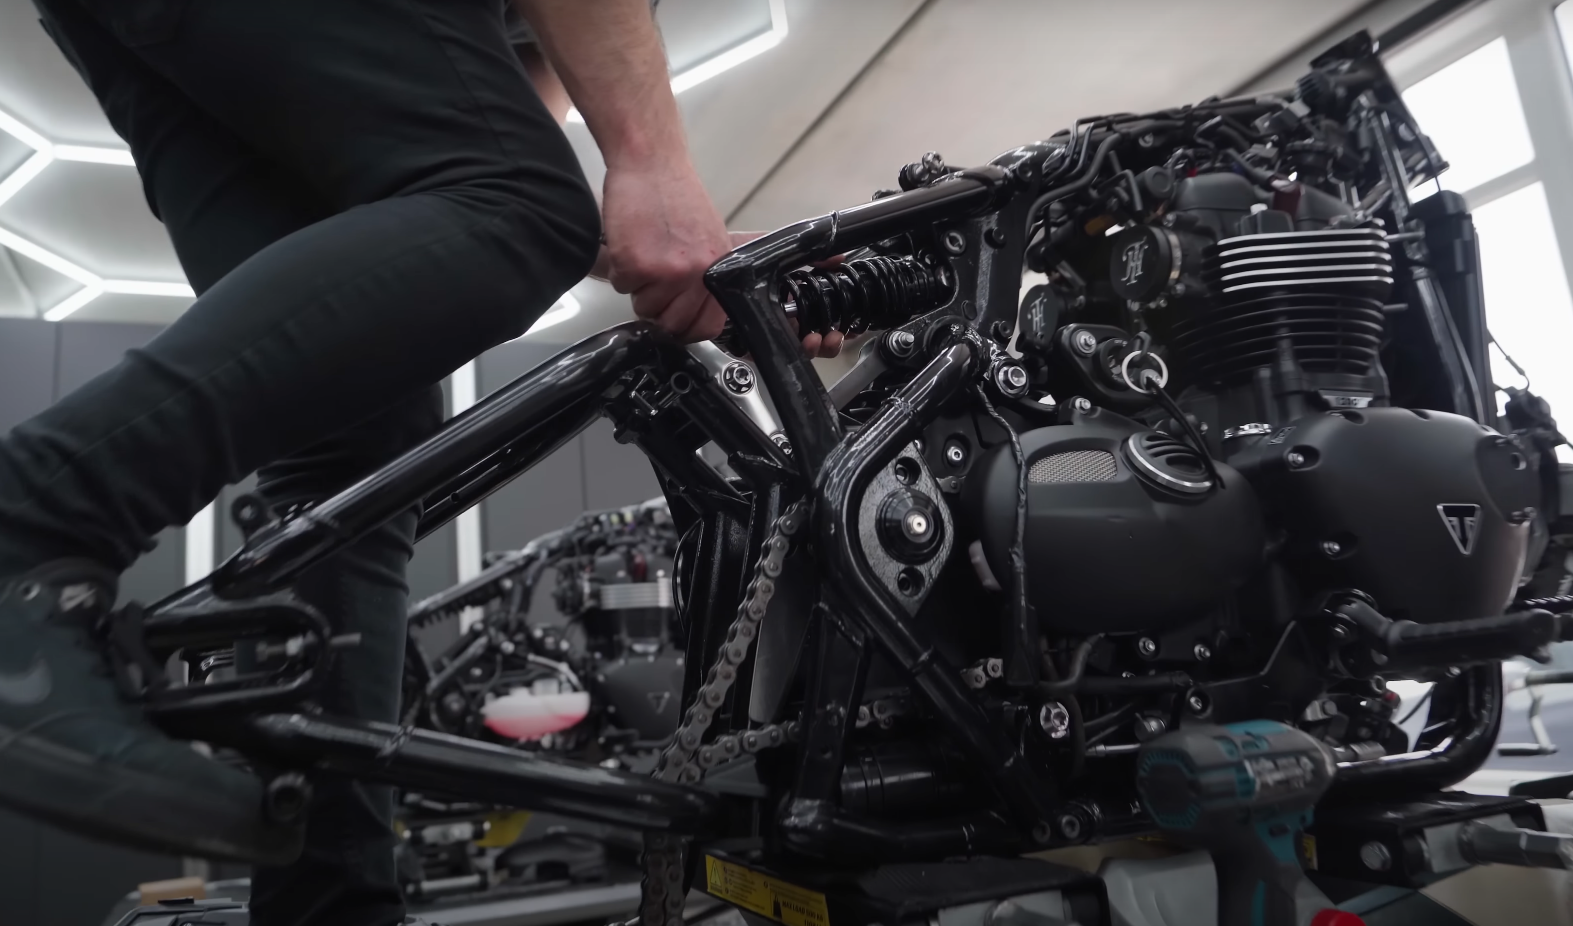
Disassembly Process
The breakdown of the bike started with the removal of both the rear and front sections. This step exposed the frame and engine, setting up for further changes.
Key components such as the steering yokes, rocker cover, and generator side cover were detached. Taking off these covers let the engine be rotated to align the timing before swapping engine internals.
The next items to come off included both the rocker and cam holders. Removing those parts made it possible to replace the camshaft with a higher lift version, which would help improve performance when the bike was rebuilt.
Summary of Major Removal Steps:
| Step | Part Removed | Purpose |
|---|---|---|
| 1 | Rear and Front Ends | Expose frame and engine |
| 2 | Steering Yokes | Prep for assembly changes |
| 3 | Rocker & Generator Covers | Rotate engine for timing |
| 4 | Rocker and Cam Holders | Swap camshaft for better airflow |
After these main parts were taken off, the bike was fully stripped to its core elements, ready for modifications and upgrades.
Changes Made to the Engine
Upgrading the Camshaft
The stock camshaft was replaced with one that has a higher lift and stays open a bit longer. This change lets more air flow into the chamber, which can lead to a stronger combustion each cycle.
Key Benefits:
- More air enters the engine
- Increased power output
- Improved acceleration
| Standard Camshaft | Upgraded Camshaft |
|---|---|
| Moderate lift and timing | Higher lift, longer duration |
This adjustment is small but helps the bike perform better on both touring and tough corners.
Adjusting Timing and Boosting Performance
After removing the rocker cover and generator side cover, it was possible to rotate and set the engine timing exactly right. With the new cam in place, the engine was timed to take advantage of the changes for better performance.
Steps Taken:
- Removed covers for access
- Installed upgraded camshaft
- Set engine timing
With these tweaks, the engine should be able to push a little more power and provide snappier throttle response. This helps especially when needing quick acceleration or more control in tight situations. All covers were then put back on, and the bike was prepped for testing on the dyno.
Putting the Bike Back Together and Final Touches
Key Steps for Building it Back Up
After taking everything apart down to just the engine and frame, the next step is getting the new and upgraded parts ready to go back on. The process starts with swapping out parts such as the rocker cover and the generator side cover so the engine can be timed right. Then, a new camshaft with higher lift and a bit longer duration gets installed. This will open the inlet valves longer, letting in more air and making a bit more power.
The rear shock and air boxes are next to be fitted. Once the rocker cover is back in place, the major components like the yolks are installed. During assembly, each part is checked carefully to make sure it fits and works with the adventure setup in mind.
Basic Steps:
- Install new camshaft for better engine performance
- Refit the rocker cover and engine parts
- Put in the rear shock and air filter boxes
- Attach the steering yolks
- Make sure each piece lines up for adventure riding
Upgrading to an Adventure and Touring Bike
The bike started as a basic model, but after reassembly, it transforms into a machine ready for touring and adventures. Lots of features get added to make long rides easier and better for carrying gear. Tank bags, dry packs, and mounting racks are set up for easy storage and quick access on trips. Auxiliary lights are fixed for riding in the dark or tunnels, and special engine guards are put on to protect the bike.
The wheels are swapped to tough, tubeless carbon ones. This means flats can be fixed easily on the road, and the gearing makes tight corners and quick take-offs smoother. Special mirrors that don’t break easily and a painted finish that stands out are also included.
New Additions and Upgrades Table:
| Upgrade | Reason/Benefit |
|---|---|
| Tank bag & luggage racks | Extra space for travel gear |
| Auxiliary lights | Better vision in dark or tunnels |
| Engine guards | Protects engine in case of a fall |
| Carbon tubeless wheels | Easy repairs and better handling |
| Higher lift camshaft | More engine power and acceleration |
| Stronger mirrors | Less damage if hit or dropped |
| Touring tires | Long-lasting and good for mileage |
Each change is made to fit personal riding needs, with attention to comfort, storage, and easy repairs during tours. All the parts are chosen so the bike is light, tough, and can handle longer rides without problems.
Reflections and What Comes Next
The bike now has a range of custom pieces and upgrades. Some of the main changes include extra storage from the Kriega luggage, a new tank bag, upgraded lighting, and engine protection. Moving forward, all these parts need to be fitted and tested for performance.
Key Tasks Completed So Far:
- Disassembled the bike to the frame and engine
- Added a high-lift cam for better power
- Chose a unique paint color
- Installed carbon wheels and special tires
Steps Remaining:
- Finish putting in the rear shock and air boxes
- Swap over the steering components
- Reattach key body parts and test all new attachments
- Double-check all upgrades for safety
| Task | Status |
|---|---|
| Frame disassembly | Complete |
| Engine upgrades | Ongoing |
| Install luggage | Planned |
| Reassembly | In progress |
After putting everything back together, performance checks will be done before the first test ride. Suggestions and lessons learned from touring experience will shape the finishing touches. As the project continues, changes and new parts may be added to further improve the bike for long rides and adventure touring.