The project began with a simple idea: take an old 1981 Suzuki GS250 and give it a new life. The bike was far from perfect, with engine noise and worn parts that needed serious attention. What started in a small shipping container workshop soon grew into a larger space, giving room to expand the vision and push the build further.
Step by step, the bike was stripped down, inspected, and rebuilt with care. From restoring the engine and upgrading the frame to custom details like the seat, exhaust, and final paintwork, each stage added to the transformation. The process was not only about fixing a machine but also about creating something lasting and personal.
Key Takeaways
- The build began with a complete teardown and inspection.
- Careful upgrades and custom work shaped the bike’s new identity.
- The final result reflected both technical skill and personal dedication.
Project Overview
Rebuilding the 1981 Suzuki GS250
The project began with a worn 1981 Suzuki GS250 that struggled to run smoothly. After checking valve clearances and adjusting the chain tensioner, the engine still made harsh noises. This led to a full teardown, with the engine removed and the frame stripped for modification.
The move from a small container workshop to a larger, permanent space provided room to expand the build. Parts were sent for powder coating, and even the bolts were zinc plated for a cleaner finish. A spare running engine was purchased, cleaned, and prepared to speed up progress while the original motor awaited repair.
Key upgrades included:
- Powder coated frame and mounts
- Custom stainless steel exhaust
- Rebuilt carburetors
- Fresh wiring setup
- Handmade seat with professional upholstery
Each step focused on both function and detail, ensuring the bike looked sharp while performing better than before.
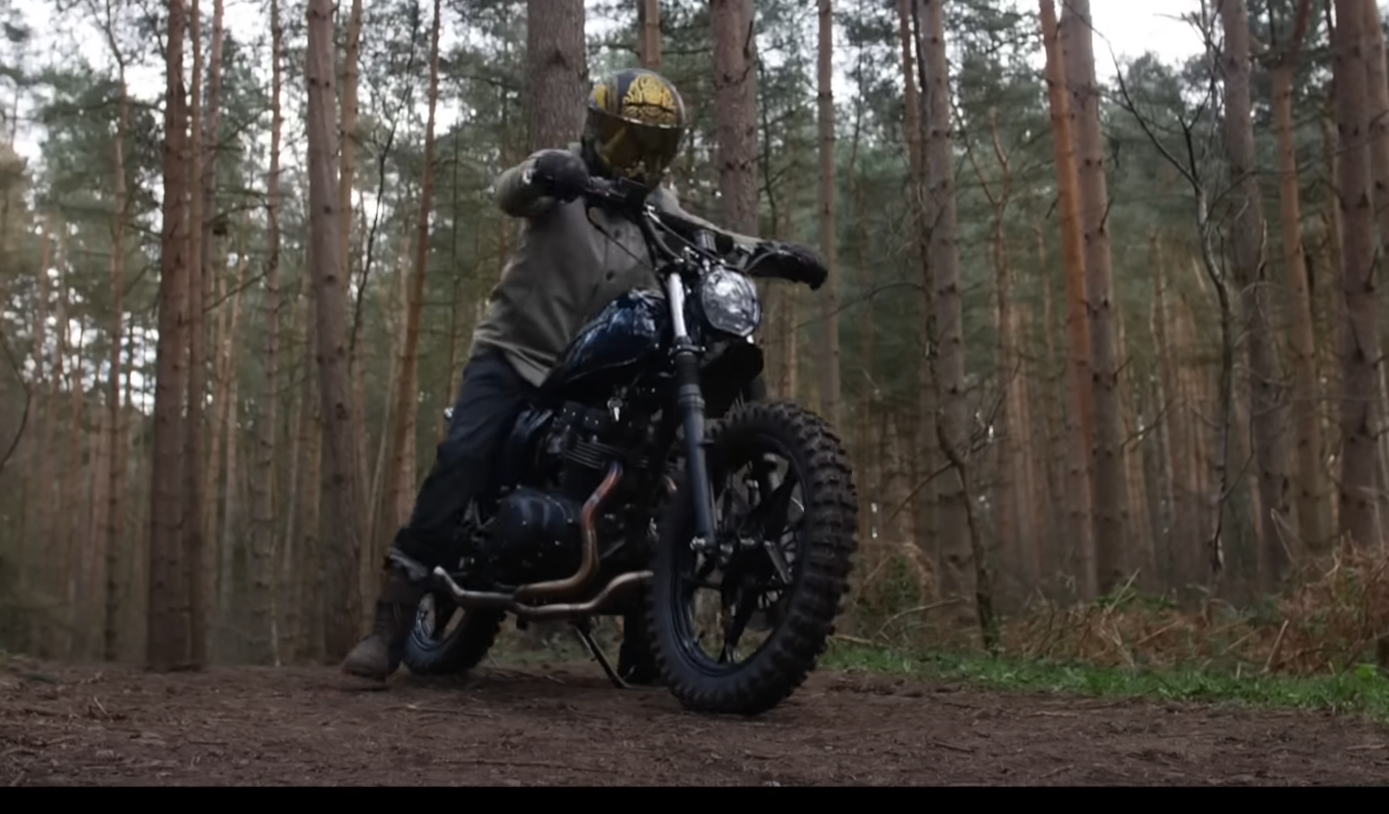
Purpose and Direction
The build aimed to take a modest commuter bike and turn it into something more capable and personal. The process was not about shortcuts but about putting effort into every part, from polishing hardware to fabricating custom pieces.
The vision centered on:
- Creating a reliable and unique ride
- Blending classic style with custom craftsmanship
- Building a machine that reflects dedication and patience
Through careful work and steady progress, the motorcycle evolved into a project that carried both mechanical improvement and personal meaning.
Early Evaluation
First Look
The bike did not sound healthy when first started. The engine noise was rough and uneven, making it clear that something inside needed attention. The seller had mentioned possible issues with the cam chain or valve clearances, so those areas became the first checks.
A quick inspection led to adjustments on the valve clearances and a rebuild of the chain tensioner. Even after these steps, the engine still produced harsh sounds. At that point, removing the engine became the next logical step.
Checking Engine Problems
Once the engine came out, a closer inspection revealed a deeper issue. The noise pointed to a spun crank bearing, which explained the constant tapping sound.
To keep progress moving, he brought in a spare running engine. Although it needed cleaning, it provided a faster way to continue the build while the original engine awaited repair.
Key checks completed:
- Valve clearance adjustment
- Chain tensioner rebuild
- Full engine removal
- Identification of crank bearing damage
This process confirmed that the engine required more than simple adjustments, setting the stage for a complete rebuild.
Workshop Growth
Starting Out in a Container
He began the project inside a 30-foot shipping container that served as his first workshop. Space was limited, but it provided enough room to pull the old Suzuki GS250 apart and inspect its issues. Early tasks included checking valve clearances, rebuilding the chain tensioner, and eventually removing the engine for a closer look.
A simple setup like this required making the most of every inch. Tools, parts, and the bike itself had to be organized carefully. Despite the tight space, the container allowed him to strip the bike fully and prepare the frame for powder coating.
Key steps in this stage:
- Inspected and adjusted valve clearances
- Rebuilt chain tensioner
- Pulled the engine for deeper inspection
- Stripped frame and prepared parts for coating
Moving Into a Bigger Workshop
After the initial teardown, he shifted from the container into a larger space that he still calls his dream workshop. The move gave him the freedom to expand his tools, spread out parts, and work more efficiently.
The new space allowed for more advanced tasks, including rebuilding the engine, zinc-plating nuts and bolts, and fabricating a custom stainless steel exhaust. The larger workshop also made it easier to handle upholstery, wiring, and bodywork without feeling restricted.
| Old Setup | New Setup |
|---|---|
| 30-foot container | Spacious workshop |
| Limited storage | Room for expansion |
| Tight work area | Organized layout |
| Basic tools | Advanced fabrication |
This transition marked a turning point in the build, giving him the environment needed to push the project from a simple restoration into a custom creation.
Taking the Bike Apart
Breaking Down the Parts
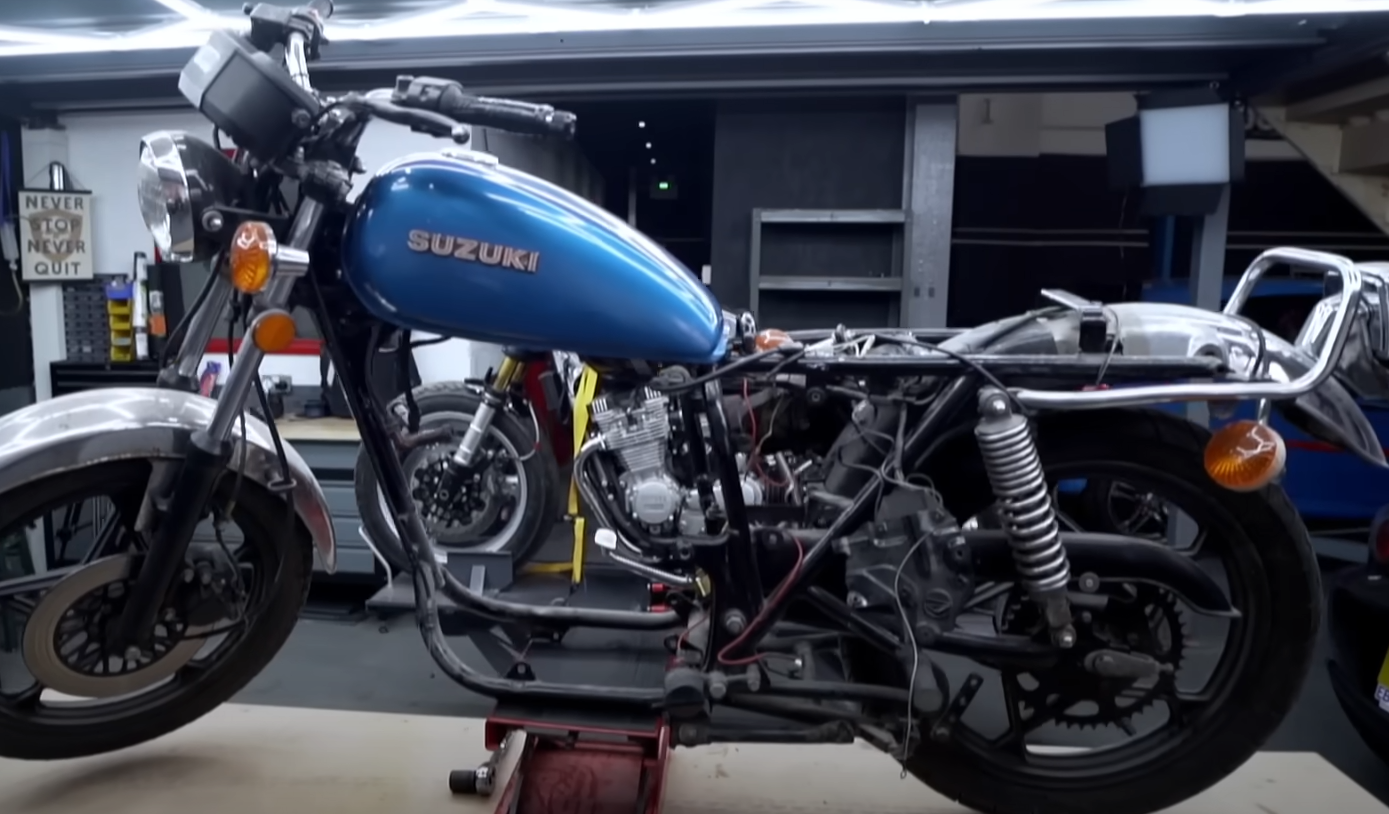
He removed the engine first to get a closer look at the problems inside. After pulling it out, he shifted the project into a larger workshop with more space to work. From there, he stripped the rest of the bike down piece by piece until only the bare frame remained.
Main steps included:
- Checking valve clearances
- Rebuilding the chain tensioner
- Pulling the engine from the frame
- Dismantling all remaining parts for frame work
Getting Ready for Coating
With the frame cleared, every part was prepped for powder coating. The frame, brackets, and other components were sent off to be coated, while the nuts and bolts were zinc plated for a cleaner finish.
| Part | Process | Result |
|---|---|---|
| Frame | Powder coating | Smooth, durable finish |
| Brackets | Powder coating | Even protective layer |
| Nuts & Bolts | Zinc plating | Fresh, corrosion-resistant look |
Once the coated parts returned, they showed a sharp, uniform finish that set the stage for the rebuild.
Engine Overhaul
Finding Engine Issues
The engine produced a harsh metallic noise that suggested deeper problems. After checking valve clearances and rebuilding the chain tensioner, the sound remained. Removing the engine allowed closer inspection, which revealed a failed crank bearing.
Key checks performed:
- Valve clearance adjustment
- Cam chain tensioner rebuild
- Full engine removal for inspection
Replacing the Crank Bearing
The noise traced back to a spun crank bearing. This required disassembly and preparation for replacement. While this step paused until other parts returned from powder coating, the plan centered on restoring smooth rotation and eliminating the tapping sound.
Focus areas:
- Bearing replacement
- Internal cleaning
- Preventing future wear
Rebuilding and Using a Spare Engine
To keep progress moving, a spare running engine was brought in. It received a thorough cleaning and was fitted into the frame while the original motor awaited repair. The carburetors were also rebuilt to match the fresh installation.
Steps taken:
- Cleaned and detailed spare engine
- Protected frame before fitting
- Rebuilt carburetors for proper function
This approach allowed steady progress while still planning a full rebuild of the original engine.
Frame and Parts Refinements
Durable Powder Finish
The frame and key parts were stripped down and sent out for a tough powder finish. This process gave the metal a smooth, even coat that not only looks clean but also protects against wear.
Benefits of the powder finish:
- Stronger resistance to scratches
- Long-lasting surface protection
- Uniform color and texture
A headlight bracket also received the same treatment, keeping the look consistent across the build.
Treated Fasteners with Zinc
All nuts, bolts, and small fittings were treated with a zinc layer. This step improved both the appearance and the durability of the hardware.
Why zinc treatment was used:
- Helps prevent rust
- Extends the life of the hardware
- Adds a bright, polished look
| Component | Upgrade Applied | Purpose |
|---|---|---|
| Frame & brackets | Powder finish | Protection + clean look |
| Nuts & bolts | Zinc treatment | Rust resistance + shine |
Custom Fabrication
Headlamp Bracket Build
He shaped and fitted a new mount to secure the headlamp in place. The piece was designed to match the updated frame and keep a clean look at the front of the bike.
- Material: Steel, later powder coated
- Purpose: Hold the headlamp securely while blending with the frame
- Finish: Powder coating for durability and style
Once coated, the bracket added both strength and a polished appearance to the build.
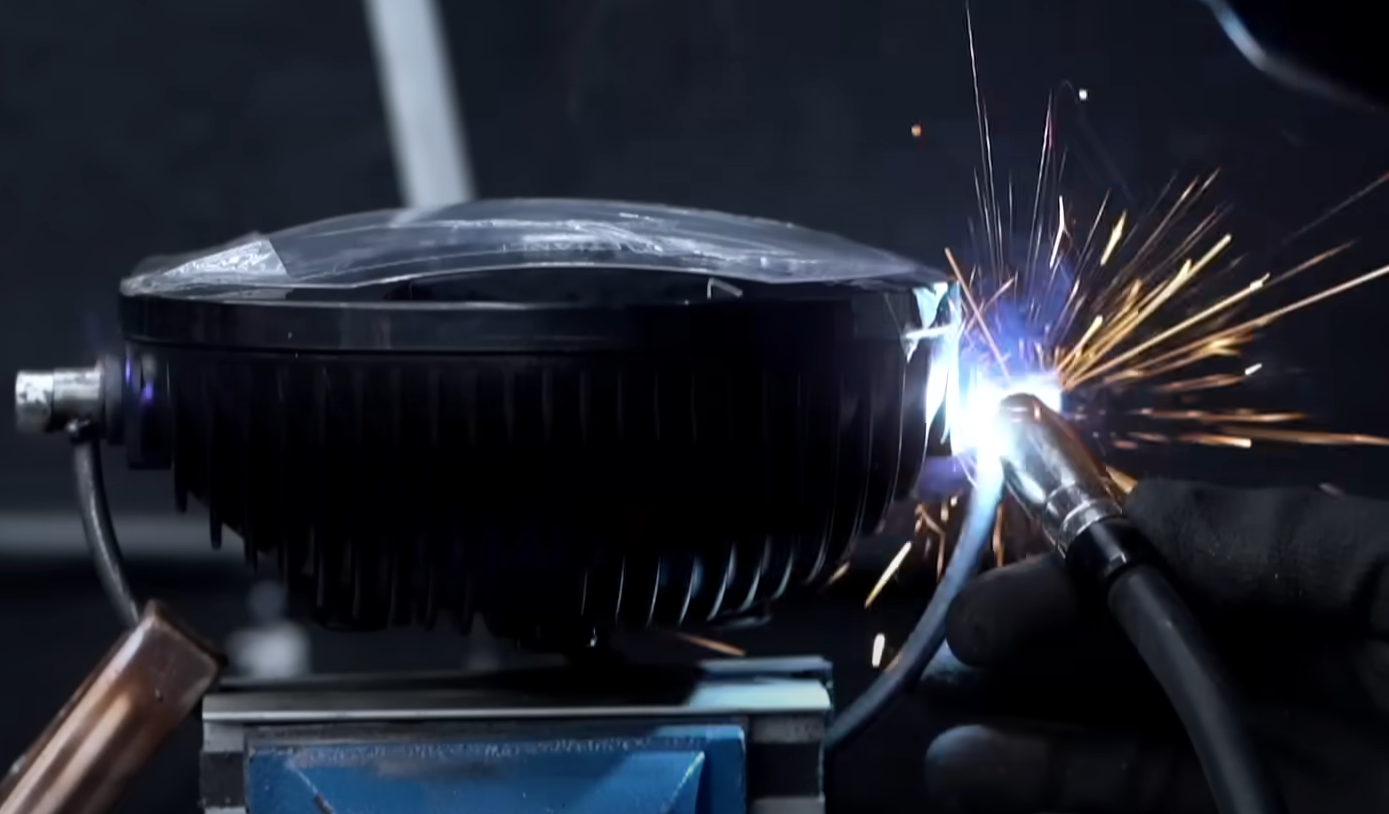
Handmade Stainless Exhaust
He chose to build his own exhaust system instead of buying a standard one. Using stainless steel, he cut, shaped, and welded each section to create a unique flow.
Process steps included:
- Cutting and shaping the pipe sections
- Tack welding pieces together for test fit
- Fully welding and smoothing joints
- Final cleanup for a clean finish
The result was a system that not only fit the bike’s design but also produced a sharp, clean sound. For a self-taught welder, the outcome balanced both function and style.
Detailing and Assembly
Fitting the Motor
The freshly cleaned replacement motor went in after protecting the frame from scratches. Careful alignment made the process smooth, and the zinc-plated bolts gave the whole setup a clean, uniform look. With the motor seated, the build started to resemble a complete bike again.
Steps taken:
- Protected the frame with padding
- Positioned the motor with steady support
- Secured with newly plated hardware
Carb Overhaul
Both carburetors received a full teardown and rebuild. Every jet, seal, and passage was cleaned before reassembly. The result was a much sharper look and improved condition inside and out.
Key tasks:
- Removed and disassembled each carb
- Cleaned internal parts thoroughly
- Replaced worn seals and gaskets
- Reassembled with care for proper fit
| Part | Action Taken | Condition After |
|---|---|---|
| Jets | Cleaned thoroughly | Clear and open |
| Seals & Gaskets | Replaced | Like new |
| Casings | Scrubbed & polished | Fresh finish |
Wiring and Power Setup
The wiring harness was completed after the carburetor work. Connections were checked to ensure reliability, with attention to routing for a neat finish. Once the electrical system was in place, the bike was ready for the custom stainless exhaust to be added.
Checklist:
- Routed wires cleanly along the frame
- Secured connections with proper fittings
- Tested circuits before moving forward
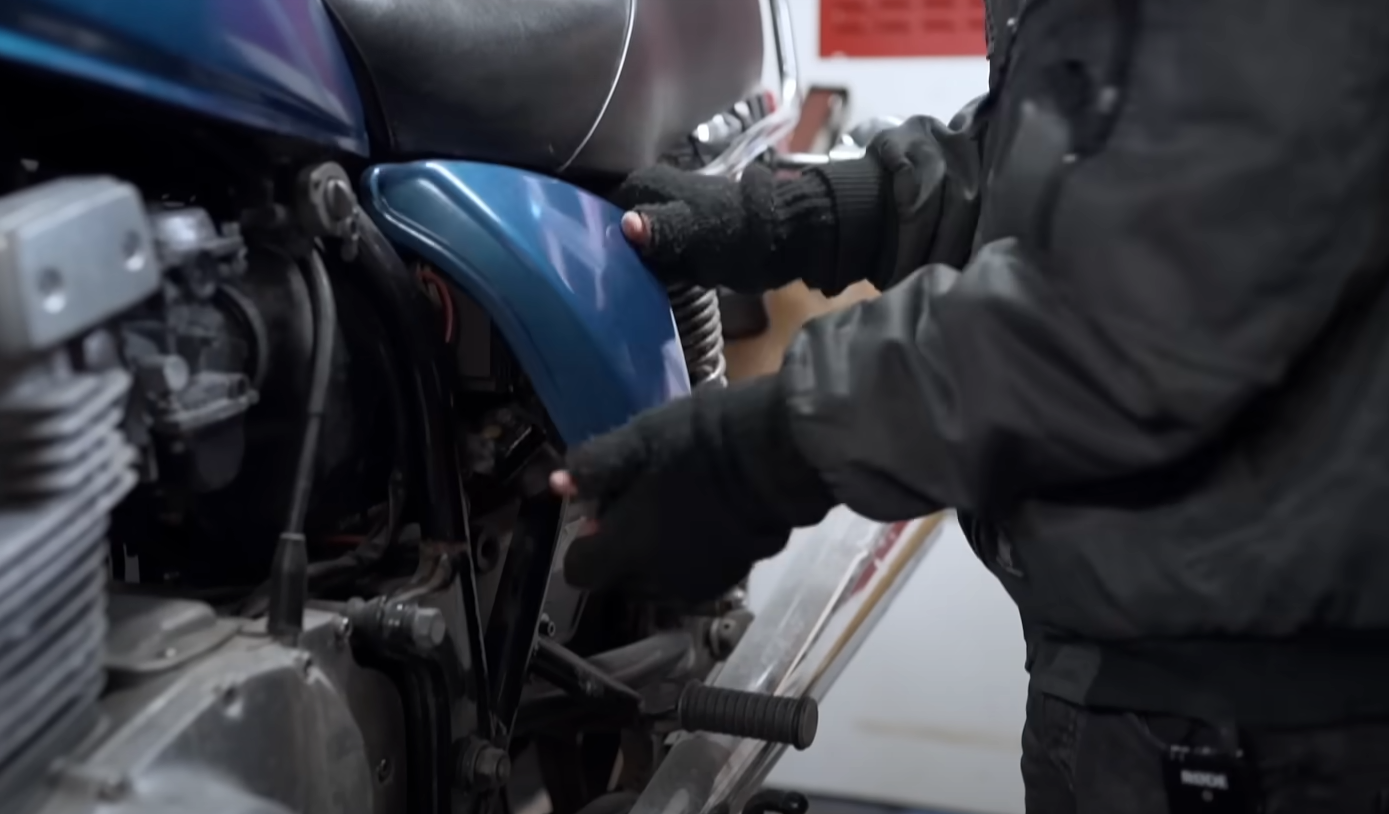
Seat and Upholstery
Layout and Pattern Work
He began by shaping a base for the seat and creating a template to guide the design. The template allowed him to check proportions and ensure the seat would fit the frame correctly. Using this method gave a clear outline for the upholsterer to follow and reduced the chance of errors later.
Steps taken:
- Cut and shaped the seat base
- Marked and refined the pattern
- Checked alignment with the frame
This process gave him confidence that the final seat would match the style of the build.
Skilled Upholstery Work
Once the template was ready, he handed it over to a professional upholsterer. The upholsterer translated the pattern into a finished seat that matched the vision for the bike.
Results:
- Clean stitching
- Tight, smooth fit over the base
- A look that tied in with the rest of the build
The collaboration between careful planning and professional skill produced a seat that was both functional and visually balanced.
Bodywork and Paint
Surface Preparation
The frame and parts were stripped down completely before being sent off for powder coating. Every component, including nuts and bolts, received fresh finishes to ensure durability and a clean look. Protecting the frame during assembly became a priority so the new coating stayed intact.
Steps taken included:
- Full disassembly of the bike
- Powder coating of frame and mounts
- Zinc plating of hardware for added protection
- Careful handling during reassembly to avoid damage
Paint Choice
Choosing the right finish was treated as a critical step since the color would define the overall character of the build. The decision carried weight because the paint scheme could either elevate the project or take away from the work already done.
Key points considered:
- The paint needed to complement the fresh powder coating
- The finish had to match the custom details, including the seat and exhaust
- The final color choice aimed to balance style with durability
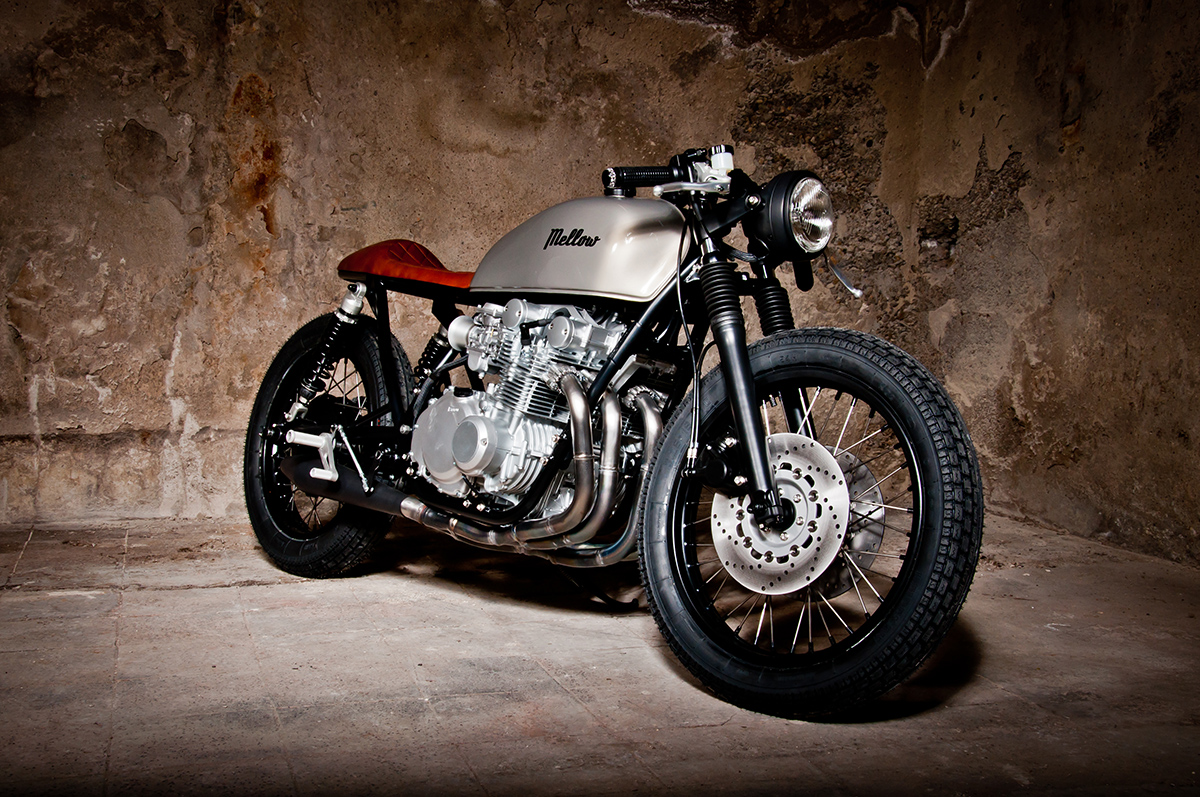
Final Unveiling and Thoughts
Project Completion
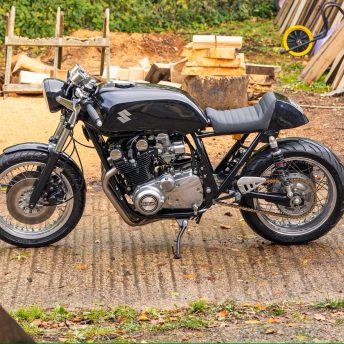
The build reached its final form after months of steady progress. Every detail, from the powder-coated frame to the custom stainless exhaust, came together with care. The bike now carries a clean rebuilt engine, refreshed carbs, and wiring that ties the entire machine together. Even the seat, shaped and upholstered to fit the frame, reflects the attention given to each step.
Key finishing touches included:
- Powder-coated frame and mounts
- Zinc-plated nuts and bolts
- Upholstered custom seat
- Rebuilt and cleaned engine
- Hand-made stainless exhaust
Personal Takeaways
The process became more than just mechanical work. It offered a way to focus during uncertain times and provided a sense of purpose. Each stage, whether stripping down the bike or fabricating new parts, reinforced the idea that effort and patience shape the outcome.
Simple lessons learned:
- Small details matter as much as big changes
- A clean workspace helps progress
- Building is as much about mindset as skill
Support From Others
The project also grew with the encouragement of a wider community. Viewers and supporters followed along, giving feedback and motivation. Patrons provided direct help that allowed the work to continue and improve.
| Type of Support | Impact |
|---|---|
| Viewers | Encouragement and feedback |
| Patrons | Financial help for tools and parts |
| Community | Shared interest and motivation |