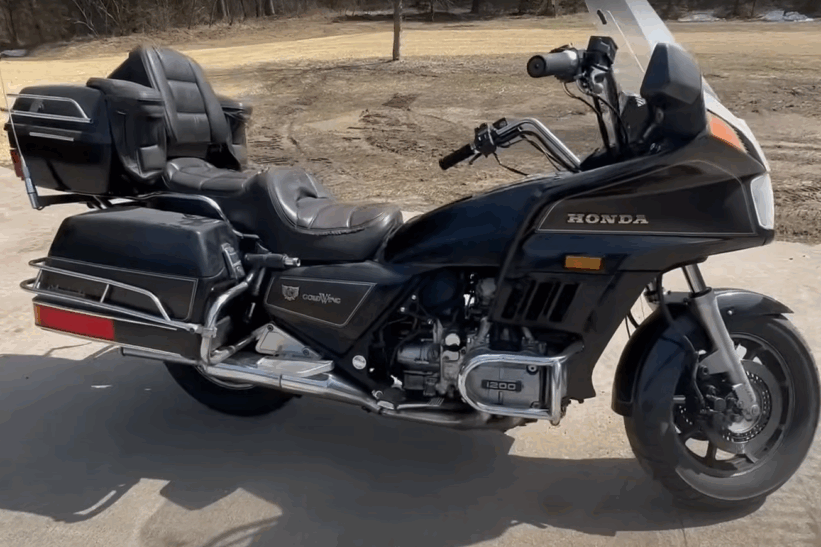
The builder continues progress on a budget-friendly Honda CX500 project, focusing on improving both function and appearance. After completing work on the rear frame and seat, attention now shifts to cleaning up the front end. He explains how to design and fabricate custom parts at home using simple tools, showing that careful planning and small adjustments can lead to professional results without high costs.
He also covers important maintenance steps, like protecting the fuel tank from rust and creating custom side covers that fit the bike’s new design. Through each step, he demonstrates practical methods and shares lessons learned from mistakes, helping others avoid common issues and build confidence in their own projects.
Key Takeaways
- The project shows how to upgrade a bike affordably with custom parts.
- Careful preparation and the right tools make fabrication easier.
- Maintenance and attention to detail prevent costly repairs later.
Project Overview and Progress
Frame Alterations
He continued refining the Honda CX500 by adjusting the frame to fit the new design. The rear section had already been shortened, and a curved hoop with a custom insert was welded in place. This setup supported the new seat and tail light assembly. The front area still needed cleanup since the wiring and gauges remained stock.
Key updates:
- Rear frame trimmed and reinforced
- Hoop and insert installed
- Wiring and headlight area prepared for modification
Seat Fabrication
He built a new seat base, added foam, and shaped it to match the bike’s new profile. The reshaped seat left a visible gap above the side covers, which led to designing custom panels. He used brown paper templates to map out folds and shrink points before transferring them to metal.
Tools and materials used:
| Tool | Purpose |
|---|---|
| Nylon hammer | Shaping metal |
| Sandbag | Supporting curved work |
| Planishing hammer | Smoothing surfaces |
| Shrinker-stretcher | Adjusting metal contours |
He emphasized that metal shaping can be done with basic tools or upgraded with power hammers for faster results.
Rear Lighting and Hoop Setup
The tail section featured a new light mounted into the custom hoop. He fabricated brackets from flat steel, keeping the design simple for home builders. The headlight, temporarily installed, came from a friend and would later be replaced with a higher-quality unit.
He also removed and planned to relocate the horn for a cleaner look. The mounting brackets were cut using a CNC tool, but he noted that a jigsaw or hand saw could achieve the same results with patience.
Steps followed:
- Cut and bend steel brackets
- Test fit lighting components
- Adjust horn placement
- Prepare for future headlight upgrade
Front End Customization
Cable and Wiring Setup
He organized the wiring at the front of the bike, which had become messy during earlier work. The original gauges stayed in place for now, but he planned to upgrade them later. He also removed the horn and considered relocating it higher up and out of the way.
Steps Taken:
- Removed loose cables and grouped them neatly.
- Planned a cleaner layout for better access and appearance.
- Checked connections to make sure everything functioned properly.
| Component | Action | Status |
|---|---|---|
| Gauges | Kept original | Temporary |
| Horn | Removed for relocation | Pending |
| Wiring | Organized and secured | Completed |
Instrument and Lighting Adjustments
He used a 160 mm headlight that a friend had given him. It wasn’t his preferred style, but it worked for now. He explained that cheaper lights often fade, rust, or leak water, so he planned to replace it with a higher-quality one later.
Notes:
- Budget parts can save money short term but may fail quickly.
- Proper lighting improves both safety and appearance.
- Investing once in durable parts avoids repeated replacements.
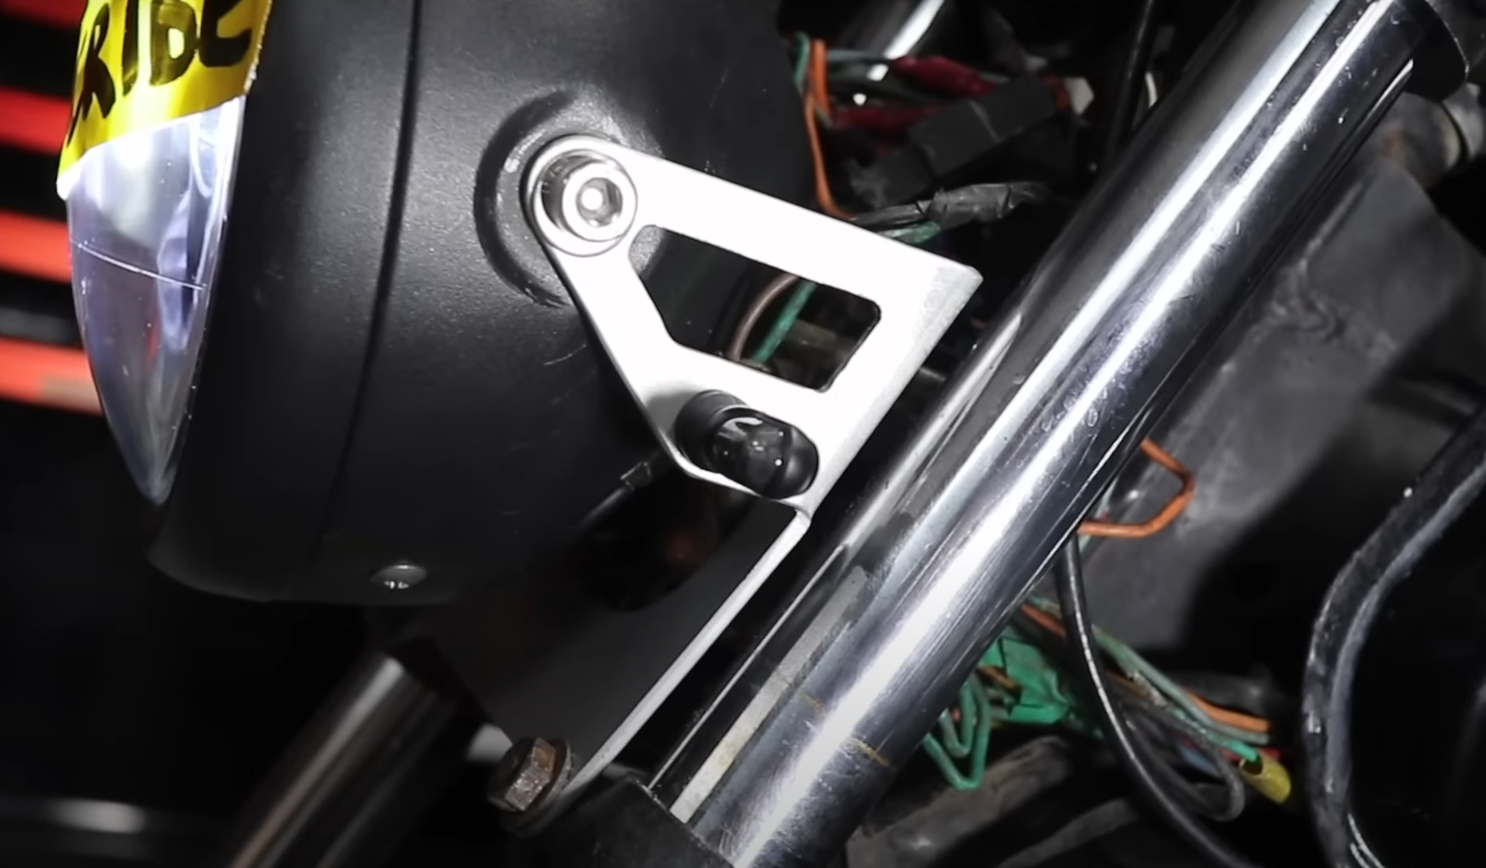
Headlight Mount Construction
He designed a simple bracket made from flat steel to hold the headlight securely. His first idea involved stainless fittings and a connecting bar, but he switched to a single-piece design that was easier to make at home.
He used an ArcDroid to cut the shape but noted that a jigsaw or hand saw with a metal blade would also work. After cutting, he bent the metal using a pan brake, but suggested that a bench vise or angle grinder could achieve similar results.
Tools Mentioned:
- ArcDroid cutter
- Jigsaw or hand saw
- Pan brake or bench vise
- Angle grinder
The final bracket fit neatly to the bike’s mounting points and gave the front end a cleaner, more finished look.
Budget-Friendly Custom Parts
Choosing Affordable Materials
He uses basic steel sheets and simple hardware to build custom parts without overspending. Flat steel works well for brackets and mounts because it’s easy to cut, bend, and weld. Stainless steel is a good option for pieces that need more strength or rust resistance.
| Material | Cost | Best Use |
|---|---|---|
| Mild Steel | Low | Brackets, mounts |
| Stainless Steel | Medium | Exposed parts |
| Aluminum | Medium | Lightweight panels |
Keeping materials simple helps reduce waste and makes repairs easier later.
Simple Methods and Handy Tools
He often relies on basic tools to shape and fit parts. A jigsaw with a metal blade, hand saw, or angle grinder can replace expensive cutting machines. For bending metal, a bench vise or pan brake gives clean edges.
- Jigsaw or hand saw
- Angle grinder
- Bench vise
- Nylon or ball-peen hammer
These tools allow most small projects to be done at home without special equipment.
Reusing and Repurposing Parts
He makes good use of donated or spare components from past builds. For example, a gifted headlight saves money even if it’s only temporary. Old parts can be cleaned, repainted, or modified to fit new designs.
Tip: Keep a labeled box for spare parts. It helps track what can be reused instead of buying new pieces. This approach keeps costs low while giving each project a personal touch.
Tank Restoration and Protection
Applying the Internal Tank Coating
He begins by cleaning the inside of the fuel tank using an aqua cleaner to remove old residue. The tank soaks for a while, then gets rinsed with clean water until the runoff looks clear. Next, he adds a rust remover and slowly rotates the tank so every area stays wet and the rust dissolves. After another rinse, he lets the tank dry completely before adding the sealant.
He pours in the sealer, rotates the tank again to coat every surface, and drains the extra liquid. Even the filler cap spring and chain receive a thin coat for added protection. The drying stage takes the most time, but the process itself stays simple and effective.
Protecting Against Corrosion and Paint Failure
He stresses that skipping a tank liner can ruin a paint job. Rust from inside the tank can eat through the metal, letting fuel bubble the exterior paint. To avoid this, he always seals the tank before painting or keeping the original finish. A proper liner keeps moisture and fuel from damaging both the metal and the paint surface.
Quick Tips:
- Always dry the tank completely before sealing.
- Keep the coating even by rotating the tank slowly.
- Use clean water for rinsing between each step.
Trusted Tank Liner Options
He recommends using a high‑quality liner kit that bonds firmly to the metal. Cheap products can peel off and clog the fuel system. His preferred brand is KBS, which provides reliable coverage and long‑term protection.
| Product | Key Feature | Reason to Use |
|---|---|---|
| KBS Tank Sealer Kit | Strong adhesion | Prevents liner flaking |
| Rust Remover (included) | Fast rust removal | Cleans metal surface before sealing |
| Aqua Cleaner (included) | Degreases tank | Ensures liner bonds properly |
Side Cover Custom Fabrication
Planning and Design Details
He began by noticing a large gap left after reshaping the seat, which made the original side covers no longer fit correctly. Instead of leaving the space open, he chose to create new custom panels that would keep the airbox and battery in place. This choice avoided tuning problems common with CV carburetors when the airbox is removed.
Key design goals:

- Maintain function of the airbox and battery
- Improve the look of the midsection
- Keep the process simple enough for home fabrication
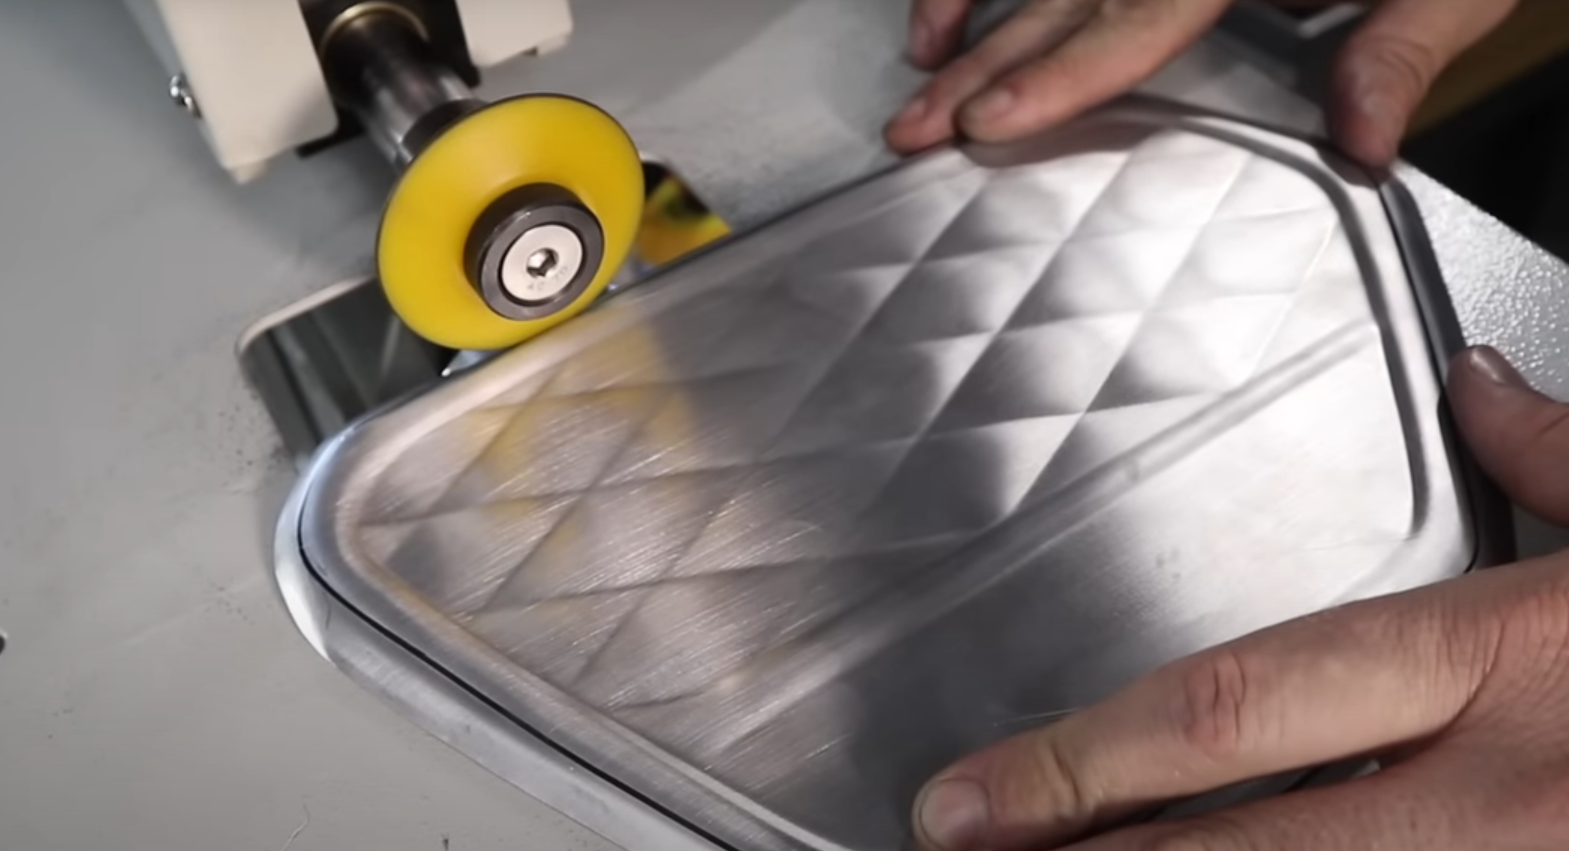
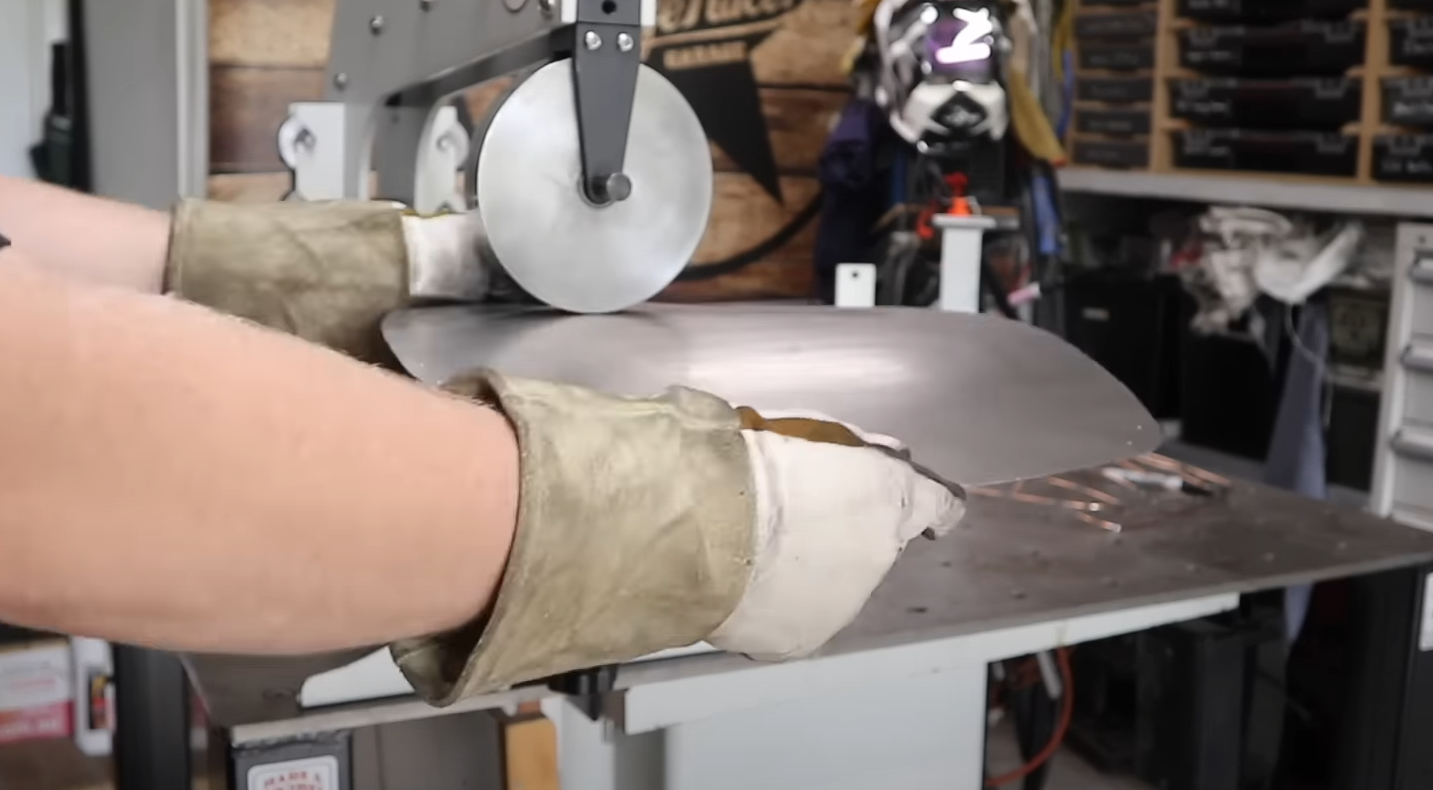
Sheet Metal Forming Methods
He used basic metal shaping tools, showing that custom work can be done without expensive equipment. Tools like a shrinking stump, nylon hammer, planishing hammer, and English wheel helped form smooth curves.
For those without advanced tools, he suggested using:
- A ball-peen hammer or tow ball as a planishing dolly
- A bench vise for holding small parts
- A sandbag for shaping and smoothing
He also used powered tools such as a pneumatic planishing hammer and shrinker-stretcher to speed up the process.
| Tool | Purpose |
|---|---|
| Shrinking stump | Reduces metal in tight areas |
| Planishing hammer | Smooths surface after shaping |
| English wheel | Refines curves and contours |
Wire Frame and Pattern Layout
He built a wire frame to define the shape of the side cover. Brown paper was placed over the frame to mark where the paper needed pleats to match the form. Each pleat showed where the metal would need shrinking.
This paper pattern was then transferred onto the sheet metal, guiding where to stretch or shrink the surface. He emphasized checking the fit often by placing the wire frame over the workpiece and adjusting any gaps before continuing.
Tip: Always note where the wire touches the metal—those points need stretching, while gaps indicate shrinking areas.
Essential Tools and Equipment
Basic Metalworking Tools
Working with metal requires a few simple hand tools. A nylon hammer, planishing hammer, and shrinking stump help shape and smooth panels. A sandbag supports curved work, while an English wheel refines the surface. Even common tools like a ball-peen hammer or a tow ball clamped in a vise can serve as a planishing dolly.
Quick Tip: Always place a soft layer between two steel hammerheads to prevent damage or cracking.
Power Tools for Faster Work
Power tools make fabrication quicker and more consistent. A power hammer and pneumatic planishing hammer speed up shaping, while a shrinker-stretcher helps form tight curves. For cutting, a CNC cutting robot, jigsaw, or hand saw with a metal blade all work—only the cutting time changes.
| Tool | Main Use | Benefit |
|---|---|---|
| Power Hammer | Shapes metal quickly | Saves time |
| Shrinker-Stretcher | Forms curves | Improves precision |
| Jigsaw with Metal Blade | Cuts steel sheet | Easy to control |
Safety Practices in Fabrication
Metalwork demands attention to safety. Always wear eye protection, gloves, and hearing protection when cutting or hammering. Keep hands clear of moving parts, and secure materials in a bench vise before bending or grinding.
Checklist for Safe Work:
- Wear protective gear
- Keep tools maintained
- Work in a clean, well-lit area
- Avoid rushing through cuts or welds
Troubleshooting and Common Mistakes
Shaping Metal Problems
When shaping sheet metal for side covers or brackets, uneven stretching or shrinking often causes warping. If the metal buck touches in some areas but leaves gaps in others, it means the panel needs more stretching where it touches and shrinking where it lifts.
Common mistakes include:
- Over-hammering one area, which makes the surface thin and weak.
- Ignoring alignment between both sides, leading to mismatched panels.
- Skipping test fits, which hides small shape errors until the end.
A simple way to track problem spots is by using paper patterns. Creases in the paper show where shrinking is needed before transferring marks to the metal.
Fixing and Adjusting Techniques
To correct shaping errors, work slowly and check progress often. Using a shrinker-stretcher, planishing hammer, or even a bench vise with a dolly helps even out curves.
| Issue | Cause | Correction |
|---|---|---|
| Panel bows outward | Too much stretching | Shrink edges slightly |
| Panel caves inward | Not enough stretch | Add gentle hammer blows in center |
| Uneven surface | Inconsistent hammering | Planish with light, even strikes |
When using power tools, maintain control and avoid rushing. Heavier tools like pneumatic hammers speed up work but can easily distort thin metal if used too aggressively. Regularly comparing both sides of the bike ensures symmetry and a clean final fit.