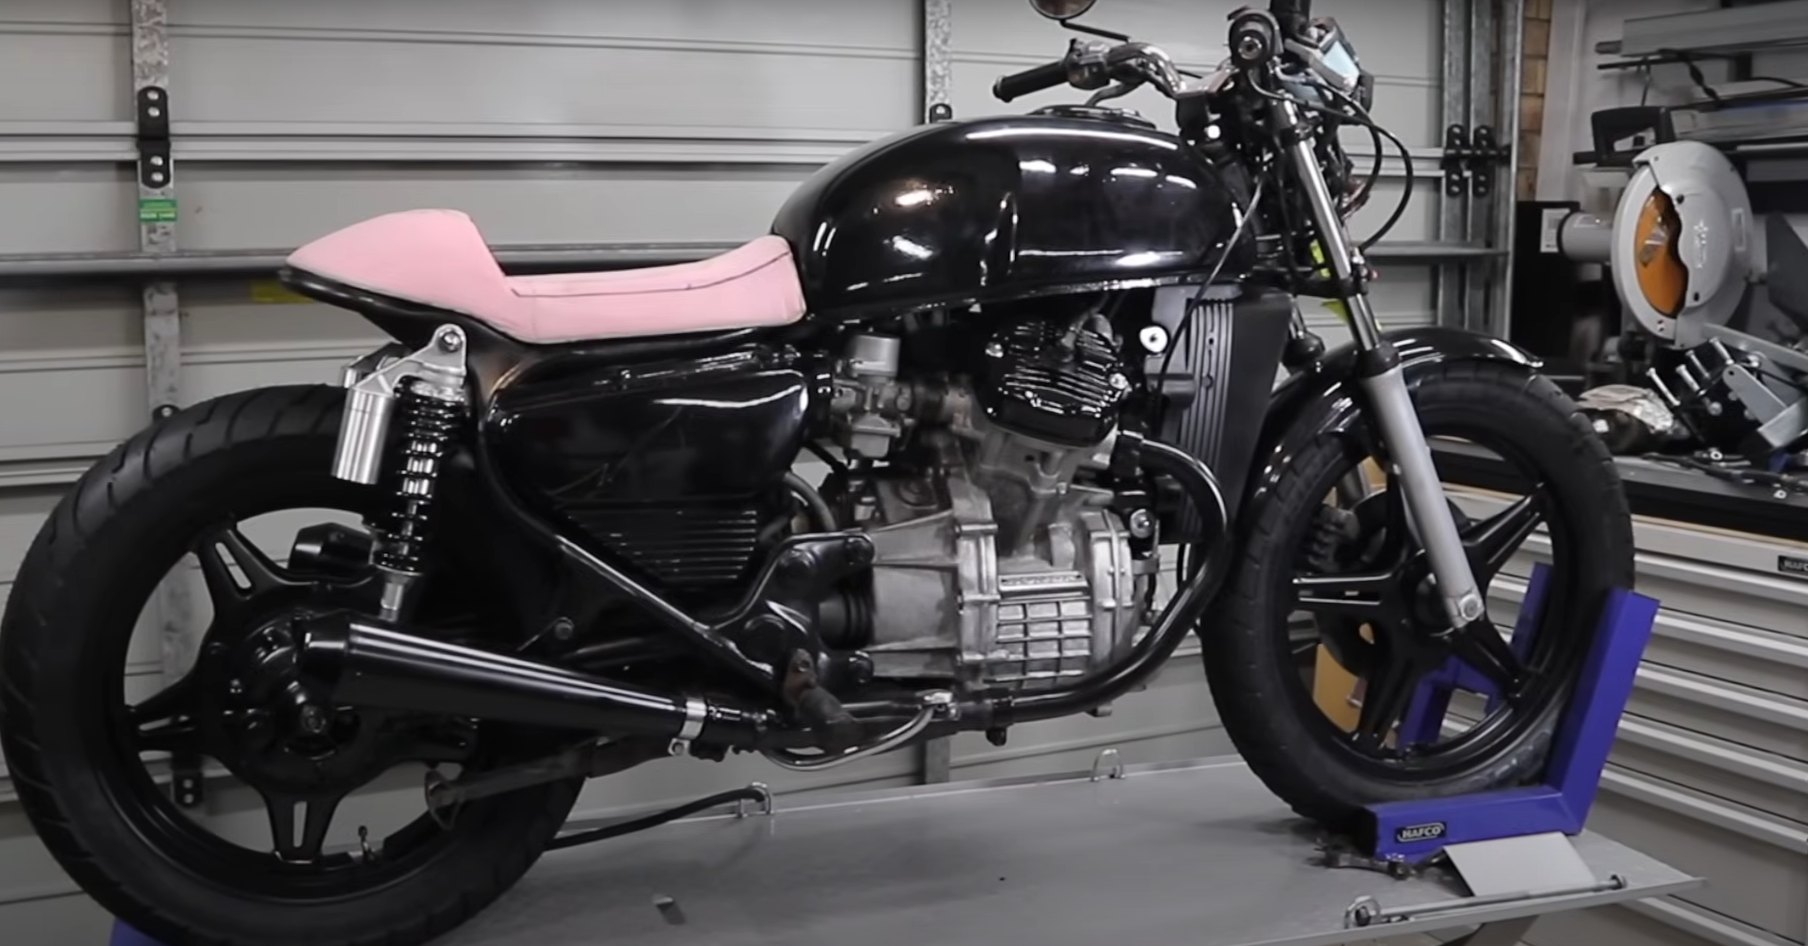
Building a custom Honda CX-500 on a budget takes careful planning and hands-on creativity. The process so far has included reshaping the frame, crafting a seat base, creating side covers, and developing a unique headlight bracket. Each step uses affordable materials and simple tools to keep costs low while ensuring that every modification fits the bike’s look and structure.
For the next stage, attention turns to making and mounting custom gauge holders and a rear mud guard. The approach sticks with do-it-yourself solutions by shaping steel for the new fender, figuring out strong mounting points, and using clever tricks like wedges and riv nuts for secure installation. Details like a tail tidy and custom turn signal mounts finish off the back end, showing how classic parts can be modified or replaced to fit new needs without spending too much.
Key Takeaways
- The build focuses on budget-friendly, hands-on modifications.
- Custom solutions are used for the gauges, fender, and mounting.
- DIY techniques help keep the project affordable and practical.
Cost-Effective CX-500 Build Summary
Modifying the Frame and Adding a Seat Loop
The frame was trimmed back and a new rear loop was added. The loop included a slot for an integrated tail light. These steps made space for custom upgrades while keeping costs down.
Making a Custom Seat Platform and Tail Light
A seat base was shaped from heated thermoplastic, fitted closely to the subframe, and fastened with seat clips. Foam was trimmed and shaped for comfort. The tail light was built into the back frame loop for a blended look.
Fabricating Unique Side Panels
Side panels were made from scratch and carefully shaped to match the CX-500’s style. The process took time but allowed for a perfect fit. Creating them in-house made the build more affordable and personal.
Designing a Headlight Mount
A custom bracket was made for the headlight using basic tools and supplies. This approach allowed them to save money and adjust the fit as needed. The mount holds the headlight firmly and fits with the rest of the modifications.
Making Your Own Gauge Cups
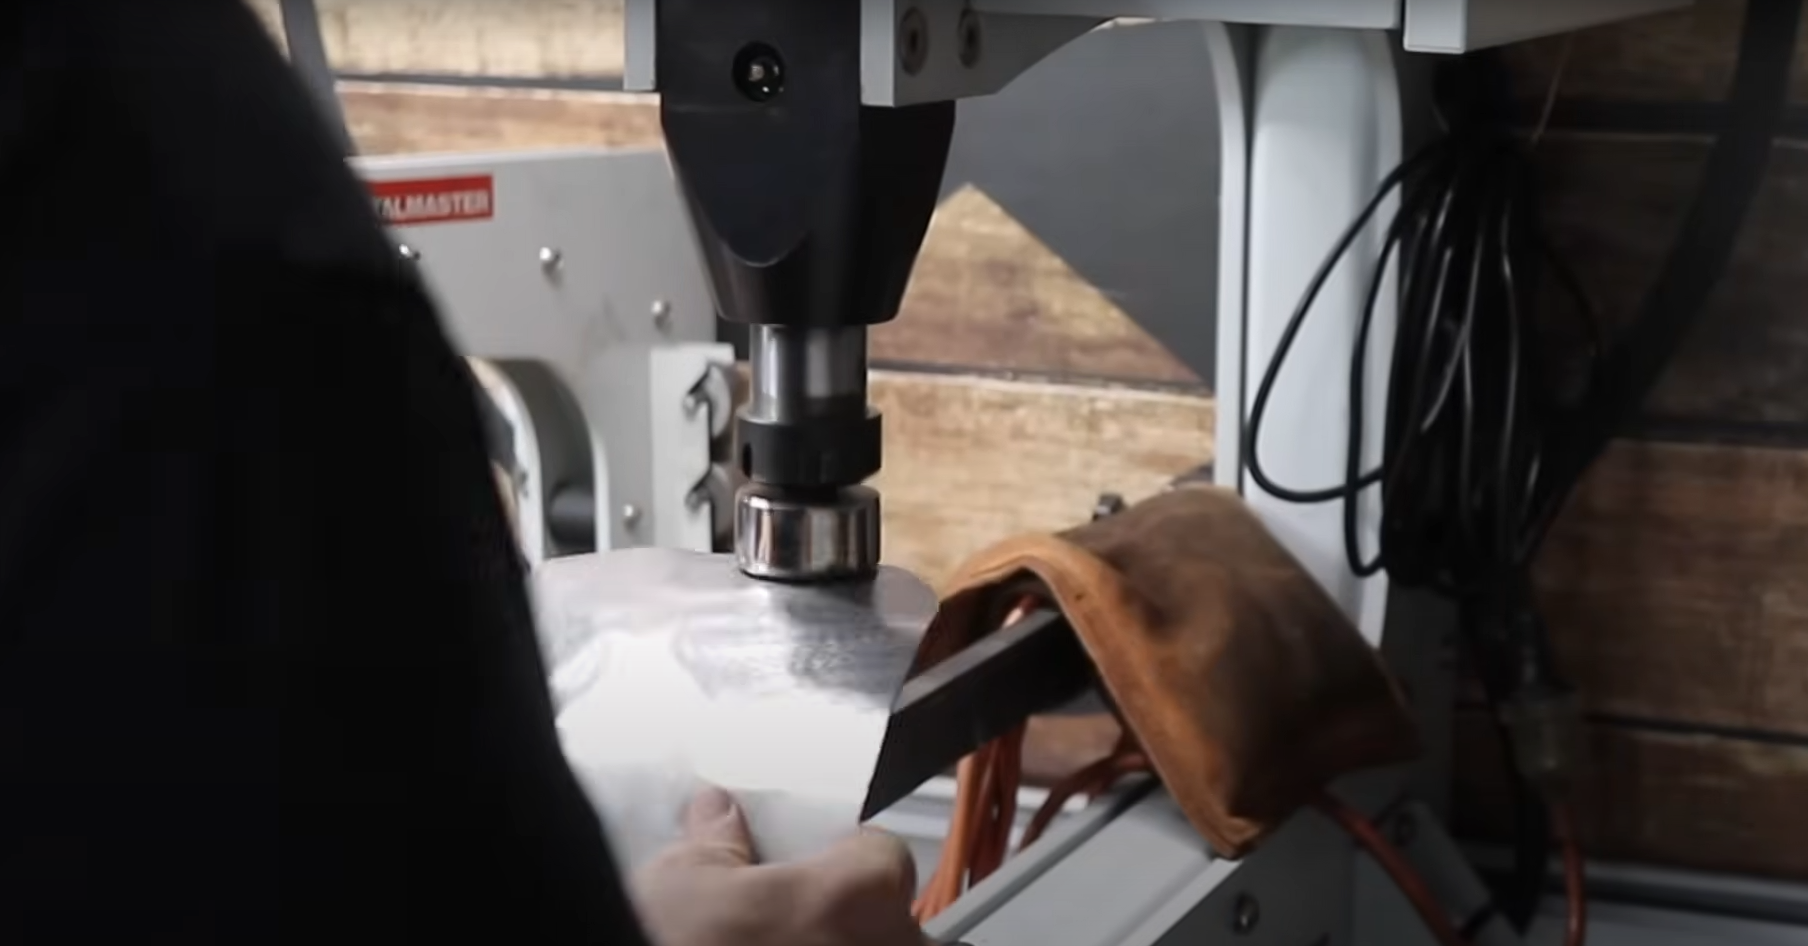
Creating Aluminium Gauge Holders
To make custom gauge holders, start by cutting and shaping aluminium tubes and discs. These parts need to be welded together to form a cup. After welding, they should be machined to smooth out rough areas and create a clean curve.
Tip: The closer you machine to the weld, the thinner the metal will get. Avoid making it too thin at the base.
Cutting, Shaping, and Finishing
The cups are refined using a lathe to get the desired curve. Sometimes, if the weld gets too thin, the cup may come apart and need to be re-welded. Multiple rounds of welding and machining may be needed for the best results.
Tables, grinders, and sanders help smooth out sharp edges. Lathes are used to get an even finish all the way around.
Ring Edges and Ways to Attach
A bezel can be made to fit around the top of the cup. This hides rough welds and gives a cleaner look. Mounting choices matter too. Tabs or simple brackets can be welded or bolted for easy attachment to the bike.
If you are drilling holes to mount the cups, use rubber grommets to protect wires and avoid damage.
Other Gauge Ideas
Instead of fabricating from metal, 3D printing is an option for making these cups. This method can save time and effort. You could also modify existing plastic parts to fit your gauges, fitting them by cutting them to size and heating to shape.
Both metal and plastic gauge holders can be attached with riv nuts if you do not want to weld. Riv nuts give you a threaded insert for easy screwing and unscrewing.
| Method | Tools | Skills Needed |
|---|---|---|
| Aluminium Fabrication | Welder, Lathe | Metalwork |
| 3D Printing | 3D Printer, File | Basic CAD |
| Modified Plastic | Saw, Heat gun | Light Cutting |
Choose the method that matches your tools and skills for the best result.
Building a Custom Rear Mudguard
Picking and Shaping Steel for the Fender
The builder starts with a sheet of cold-rolled mild steel, 1.2 mm thick. This thickness is strong enough for fender use but still bends with common tools. The steel is cut and shaped by hand to match the look needed for the bike.
Key Materials:
- Cold-rolled mild steel
- Original plastic guard (used as a guide and inner liner)
The piece is formed with a nylon hammer to get an initial curve, then checked for fit on the frame.
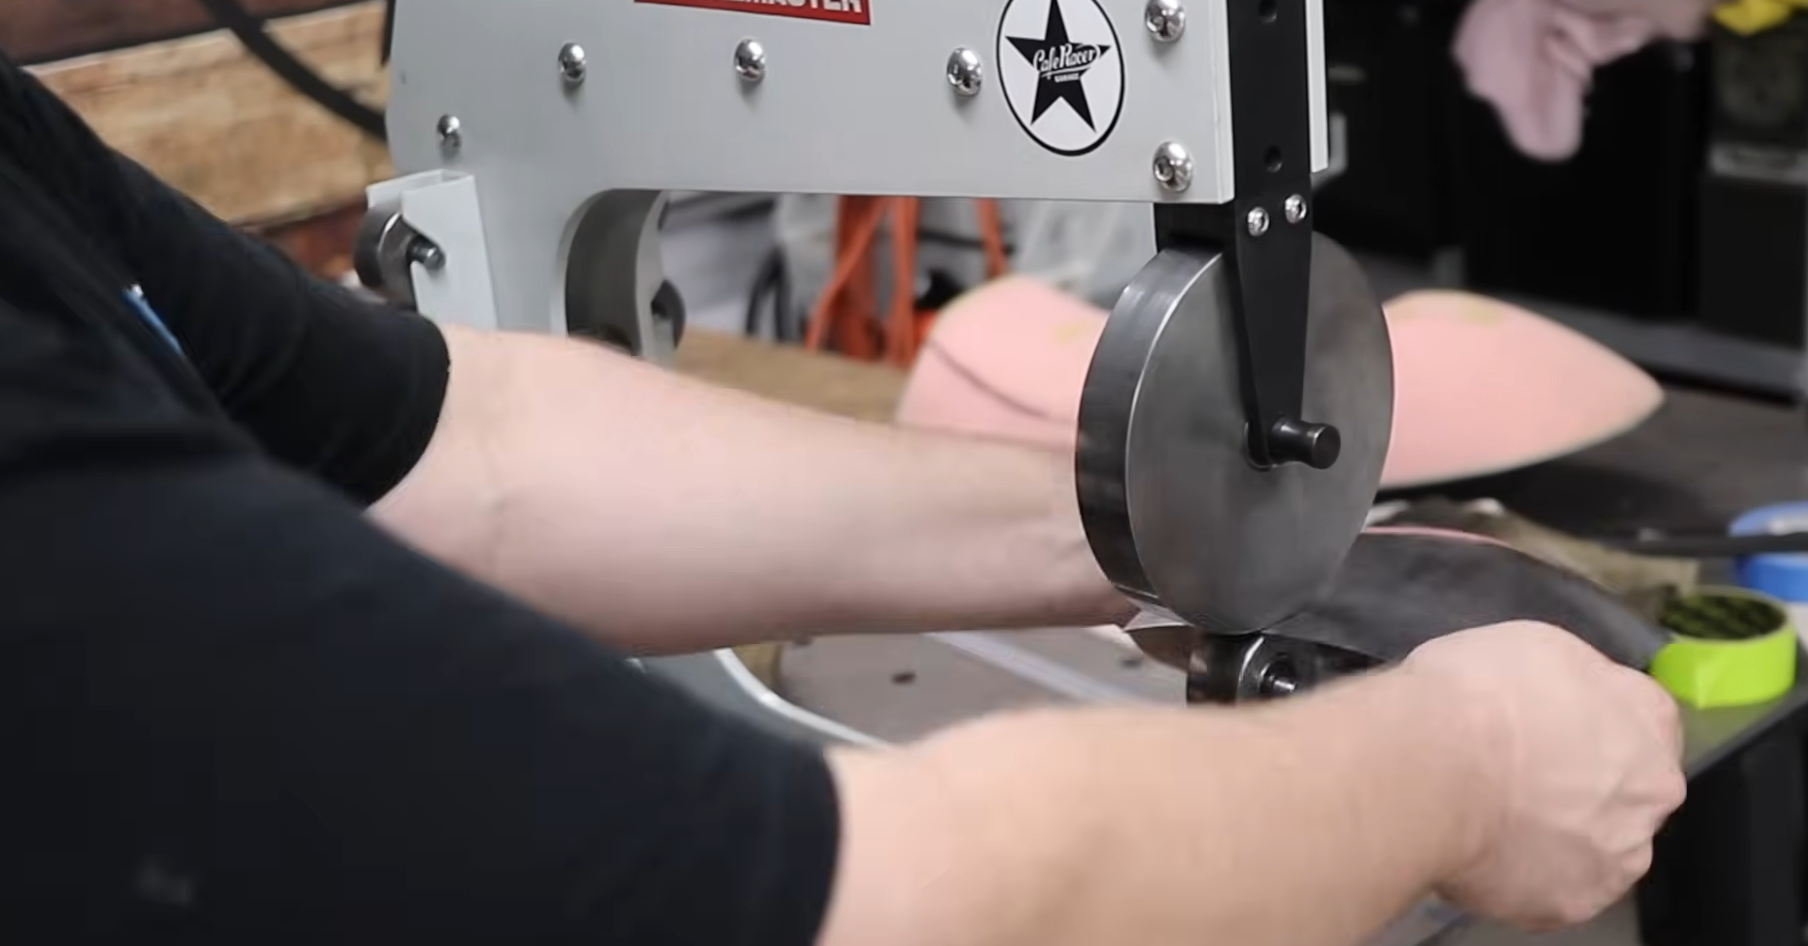
Making Curves and Smoothing Out the Shape
To shrink and curve the steel, a power hammer is used. This makes sections of the fender tuck in where needed. After shrinking, a planishing hammer smooths any rough areas and helps even out the curves.
Tools for the Job:
| Tool | What It Does |
|---|---|
| Power Hammer | Shrinks and curves steel |
| Planishing Hammer | Flattens and smooths |
| English Wheel | Refines the curves |
The process is repeated until the fender matches the desired shape.
Using a Roller to Add Strength
With the basic shape finished, a bead roller is used to press lines into the steel. This makes the fender much stronger and stops it from flexing. Multiple passes with the roller, and swapping out dies each time, adds both depth and strength.
Why Bead Rolling Matters:
- Adds stiffness to thin metal
- Helps keep the fender from vibrating or bending
- Mimics classic fender styles
Creating the Folded Edge and Center Seam
The final detail involves tipping the edges and folding them over, copying the style of the original Honda fender. This creates a tight seam around the outside, boosting strength and giving a clean look.
Steps in Tipping and Seam Making:
- Use the bead roller to tip the outer edge.
- Shrink corners with a foot-operated shrinker for tight bends.
- Fold the edge back onto itself for a double thickness.
Fenders are then test-fitted, with new mounting tabs tacked to the frame for stability. Rubber grommets are suggested where wires pass through, and spacers can be added for a custom touch. Riv nuts or welded nuts can be used to mount turn signals securely.
Ways to Attach the Rear Mud Guard
Creating Brackets and Mount Locations
To mount the rear mud guard, sturdy brackets can be made and attached to the bike’s frame. Metal tabs can be tacked or welded where support is needed. These tabs should line up with the mud guard, allowing bolts to secure it in place. It is helpful to use two or more mounting spots at the back for extra stability. Existing mounting holes on the bike can sometimes be reused for this purpose.
If there is no welding equipment, riv nuts offer a handy way to add threaded mounts. Drill holes where needed, insert the riv nuts, and use a rivet tool to press them in. This gives a strong spot to screw in bolts, which is also useful for things like attaching turn signals.
Using Modeling Clay for Measuring Gaps
A soft modeling material, like kids’ plasterine, makes it simple to measure uneven gaps between the mud guard and the frame. Press the clay into the gap to create a custom wedge. This wedge will fill the space and help align the guard during mounting. The clay holds its shape and is easy to remove, making it much faster to get a correct fit compared to guessing or using cardboard.
Below is a simple table describing the process:
| Step | Tool/Material | Purpose |
|---|---|---|
| Fill the gap | Plasterine/clay | Get exact wedge shape |
| Remove and trace | Plasterine/clay | Use shape for metal insert |
| Make wedge | Metal, based on clay | Fill gap without distortion |
Making Sure the Guard Stays Strong and Straight
Strength is added by shaping the edges of the metal mud guard. Rolling or folding the edges back on themselves, much like the original factory design, makes the guard less likely to bend or twist. This can be done with simple metal tools like a bead roller or planishing hammer.
Tips for a strong, well-aligned mud guard:
- Use multiple passes with rolling tools for smooth, even edges.
- Shrink or stretch corners as needed to match the curve of the bike.
- Double-check the alignment before tightening bolts, using spacers if needed for a custom fit.
- If drilling holes for wires, protect them with rubber grommets to prevent damage.
Taking these steps will help the mud guard look neat and hold up well under use.
Tail Tidy and Number Plate Bracket Setup
How the Arc Droid Shapes the Number Plate Bracket
The Arc Droid was used to cut out the main piece for the tail tidy, or number plate bracket. This bracket includes side tabs that can either be trimmed off or bent at a 90-degree angle for mounting turn signals. The piece fits Australian number plates exactly. For those interested, brackets like this can be ordered online and are pre-cut for this purpose.
A custom extension piece was also made so the bracket could use the pre-drilled bolt holes already present on the bike. This helps the bracket fit securely and makes use of existing mounting points.
Key steps:
- Cut bracket using the Arc Droid
- Tabs allow for extra mounting options
- Matches the size of the correct number plate
- Added extension for existing bolt holes
Customizing Tabs for Rear Turn Signals
The tabs included on the bracket can be changed based on what is needed for mounting the rear turn signals. One method is to drill holes in the tabs and weld them to the side of the bracket. Another option is to weld a stainless steel nut flush with the outside edge of the tab, allowing the turn signals to screw in directly.
For those without welding tools, riv nuts are a good alternative. Riv nuts can be installed after drilling the holes and provide a strong thread for attaching turn signals. It’s important to use rubber grommets when running wires through steel to stop the wires from being damaged.
Tips for turn signal mounting:
- Drill holes in tabs as needed
- Weld nuts for screw-in mounting, or use riv nuts if welding isn’t possible
- Use rubber grommets for wiring protection
- Aluminum spacers can be used for a custom look
Making the Bracket Fit Pre-Drilled Holes
The number plate bracket was designed so it could use the holes that were already drilled in the bike’s frame. This meant making an extension piece for the tail tidy. With this setup, no extra holes needed to be drilled and the fit was more secure.
Most stock rear fenders have holes that can be used for mounting a tail tidy, so a custom bracket or an extension may be needed depending on each bike. This helps the setup work with different fender designs and makes installation simpler and more stable.
| Step | Purpose |
|---|---|
| Use pre-drilled holes | Keeps install simple |
| Add bracket extension | Fits existing frame properly |
| Match holes for stability | Secure bracket and plate |
Using these steps, the bracket and tail tidy lined up well with the bike and gave a neat finish without the need for extra drilling.

Changing the Stock Rear Mudguard

Cutting and Adjusting the Fender
First, the original rear mudguard needs to be trimmed to fit the new look of the bike. They mark where it should be cut, then carefully remove the extra plastic or metal. This helps keep the fender the right size and shape for the new build. They use a wedge as a guide to get a perfect fit with the frame.
Key Points:
- Mark the new fender length with tape or a pencil.
- Use a saw or cutting tool for a clean edge.
- Double-check the fit before making any final cuts.
Making and Attaching Mounting Brackets
Custom brackets are needed to put the fender back on the bike. They make a simple bracket from metal and weld it to the fender. For extra mounting points, drilled holes in the frame or fender can be used.
A welding tip: hold a piece of copper behind any holes so the weld won’t stick; this lets the area be filled neatly.
Bracket Steps:
- Cut bracket material to size.
- Tack weld the bracket to the fender.
- Drill holes for mounting bolts.
- Attach tabs for turn signals by welding nuts flush or using riv nuts if welding is not available.
| Method | Tools Needed | Note |
|---|---|---|
| Welding nuts | Welder, stainless nuts | Strong, permanent mount |
| Riv nuts | Rivet gun, riv nut kit | Good for those without welder |
Use rubber grommets when drilling for wires to stop them from rubbing.
Fitting the Plastic Inner Shield
If the stock plastic lining from the old fender is still around, it can be heated and bent to match the new fender’s shape. Just slowly warm the liner and press it into place. This helps keep mud and dirt off the back of the seat and frame.
Benefits:
- Easy to reuse the original shield.
- Less mess thrown up by the wheel.
- No need to buy extra parts.
Creative Approaches for Mounting Turn Signals
Attaching Stainless Nuts as Mounting Points
One option uses stainless steel nuts. The nuts are welded flush to the edge of the mounting tab. This gives a strong threaded spot to screw in the turn signal. It keeps the look clean and sturdy. This method works well if welding is available.
Benefits:
- Strong and durable hold
- Clean appearance
Fitting Rivet Nuts Without Welding
If welding isn’t possible, rivet nuts offer a solid alternative. Drill a hole where the turn signal will go. Place a rivet nut in the hole, and use a rivet tool to set it. Now, turn signals can be screwed in securely.
Steps to Install:
- Mark and drill the correct-sized hole.
- Insert the rivet nut.
- Use the tool to lock it in place.
- Check thread for fit.
Tip: Check if the turn signals use M6 or M8 threads, as rivet nut kits come in different sizes.
Safe Wiring with Rubber Grommets
Whenever wires pass through metal, rubber grommets keep them safe. After drilling any holes, slip a rubber grommet into the hole before threading wires through. This stops the edges from cutting the wire and helps avoid electrical shorts.
Why Use Rubber Grommets?
- Protects wires from sharp metal
- Helps prevent electrical problems
- Easy to install
Custom Aluminum Spacers for Mounting
For a more unique look, aluminum spacers can be made. Spacers fit between the tab and the turn signal. They provide extra space and a custom style. The length and size can be adjusted for the exact fit and look needed.
Spacer Ideas:
- Use thicker spacers for a bolder style.
- Paint or polish for a custom finish.
- Mix sizes for a layered effect.
Tip: Test with different spacer sizes to find what fits your build best.